
Skype for Business is a great tool to communicate with other people. It’s developed by Microsoft and offers remote communications via varying channels such as audio, text, and also video chat. Its features include video conferencing, call recording, instant messaging, voice calls, whiteboard collaboration, and file sharing, among others.
But what if you want to remove this app? You may need to know how to uninstall Skype for Business. If you wish to revert back to using the standard Skype, which requires less than 20 people, you may need to uninstall Skype for Business. The same goes if you’re going to use a competitor app. Another article about uninstalling the app will be more comprehensive, it is based on MAC devices. Click the link to have a look.
Fortunately, you’ve come to the right place. We will teach you how to uninstall Skype for Business. This will allow you to use another virtual communication platform for your business or work needs. If you just want to remove it in order to reinstall it back again, we will help you uninstall it too.
Part 1. Why Does Skype For Business Keep Popping Up?
Before we teach you how to uninstall Skype for Business, we will show you how to stop it from automatically showing up. Usually, the standard Skype and the Skype for Business app automatically start or pops up when you log into your computer.
The reason is that Skype wants you to receive calls and messages every time someone wants to contact you. It has to be ready to receive communication all the time. The problem with this is that it slows down your boot-up process.
In addition, it will keep running within your system background. Thus, it will consume a lot of resources and slow your Mac (or PC) down. This is a big negative impact on the computer’s actual performance. Thus, it makes sense to turn it off.
Another thing to note is your frequency of use with the Skype for Business app. If you don’t use it that often, or if you use it only on a set schedule, then you may want to close it when you don’t need it. This will save computing resources too.
That’s why we will be showing you the different steps you should follow in order to stop Skype for Business from popping up all the time. So before we implement how to uninstall Skype for Business, check out the steps below:
- Go To The Dock. The first thing you have to do is to go to the Dock of your Mac computer. If Skype for Business is there, right-click its icon. We will be implementing the method of removing the Skype for Business as your login item.
- Go To Options. Once you have right-clicked the Skype for the Business icon, visit Options. Then, click the selection that says Open At Login. This can be found within its contextual menu.
- Double Check. Now, ensure that the option that says Open At Login is now unchecked. This will stop Skype for Business from automatically opening when you launch your computer.
Now, let’s try another thing. Before we start on how to uninstall Skype for Business, let’s talk about how to stop it from opening automatically using the Settings section of your Mac. This can be done within the System Preferences. Check out how to do it below:
- Click The Apple Icon. The first thing you have to do is to click the Apple icon within the Mac. This can be found on the upper menu bar.
- Visit System Preferences. A drop-down menu will show up, now you have to visit System Preferences.
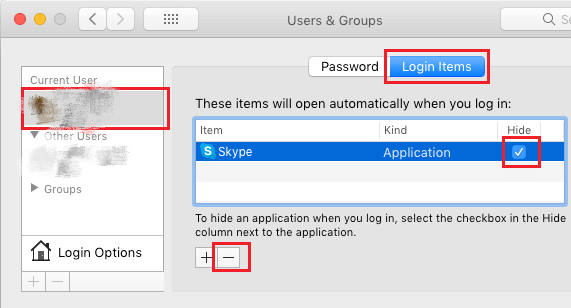
- Go To Users & Groups. The next thing you should do is to visit the option that says, Users & Groups.
- Visit Your Account. Then, locate the list of users on the left sidebar. You can click the specific account you own. Then, go to the tab labeled Login Items.
- Choose Skype. Now, in the window for Login Items, you have to choose Skype. Then, click the icon that looks like a minus (-) sign. This will stop Skype from automatically starting on your Mac computer when logging in.
Part 2. How Do I Completely Uninstall Skype For Business?
In this section, we will be focusing on the manual techniques on how to uninstall Skype for Business on Mac and Windows. This will be divided into two sections. Check it out below.
Uninstall Skype For Business On Mac
Skype is a very popular app for communication. Skype for Business is an enterprise-level app that’s more useful nowadays. However, there may come a time when you have to delete the app on your Mac. That’s why we’ll elaborate on how to uninstall Skype for Business. Check out the steps below:
- Open Skype For Business. Obviously, the initial step will be to open Skype For Business. Then, go to the toolbar of the app.
- Sign Out. The next step is to click the option that says Skype For Business in the toolbar. Then, select Sign Out.
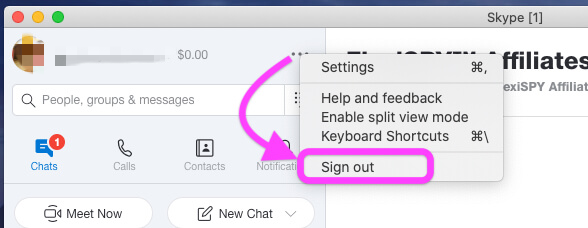
- Close The App. Exit the login page of Skype For Business. Then, make sure to quit the app on the Dock of the Mac computer.
- Trash The App. Launch the Finder on your Mac computer. Go to the toolbar and press Go. Select Applications and then find the Skype for Business app. Drag it towards the Trash.
- Empty Trash. The next step will be to empty your Trash on Mac.
You may think you have fully implemented how to uninstall Skype for Business. However, this isn’t the case for Mac computers. You still have to remove leftover files from your system. These leftover files are found in different folders on your Mac. Check out the steps below:
- Launch Finder. To start the process on how to uninstall Skype for Business completely, you must launch Finder. Then, click Go within the toolbar.
- Open Terminal. Now, choose the option for Utilities and choose Terminal.
- Run these libraries within the Terminal. Make sure you use the most recent commands as shown in the support website of Microsoft. The terminals are as follows:
- find -f /private/var/db/BootCaches/* -name “app.com.microsoft.SkypeForBusiness*” –exec sudo rm –rf {} +
- rmdir ~/Library/Application\ Scripts/com.microsoft.SkypeForBusiness
- sudo rm -rf /private/var/db/receipts/com.microsoft.SkypeForBusiness*
- rm -rf ~/Library/Cookies/com.microsoft.SkypeForBusiness*
- rm -rf ~Library/Application\ Support/com.apple.sharedfilelist/com.apple.LSSharedFileList.ApplicationRecentDocuments/com.microsfoft.skype
- rm -rf ~/Library/Application\ Suport/CrashReporter/Skype\ for\ Business_*
- rm -rf ~/Library/Prefernces/com.microsoft.SkypeForBusiness.plist
- rm -rf ~/Library/Saved\ Application\ State/com.microsoft.SkypeForBusiness.savedState
- rm -rf ~/Library/Logs/DiagnosticReports/Skype\ for\ Business_*
- rm -rf ~/Library/Containers/com.microsoft.SkypeForBusiness
- defaults delete com.microsoft.SkypeForBusiness || true
- sudo rm -rf /Library/Internet\ Plug-Ins/MeetingJoinPlugin.plugin
- sudo rm -rf /Applications/Skype\ for\ Business.app
- Launch Finder. Open Finder again within your Mac. Then, choose to Go within the toolbar. After that, select Utilities.
- Choose Keychain Access. The next step is to choose Keychain Access and go to logon keychains.

- Delete Its Skype For Business. Then, remove Skype For Business.
Now, you have finished the process on how to uninstall Skype for Business on your Mac computer. Let’s move on to the Windows 10 platform.
Uninstall Skype For Business In Windows 10
Removing Skype for Business on Windows 10 is easier compared to doing it on Mac computers. That’s because there’s an uninstaller for it. Here are the steps you should follow on to uninstall Skype within Windows 10 computers.
- Launch Start Menu. The first thing you should do is to open the Start menu of your Windows 10 computer.
- Go To Settings. Then, you’d have to go to Settings and choose Apps.
- Uninstall Skype For Business. After that, locate the Skype for the Business app within the list of apps that appear. Then, click Uninstall.
- The last step is to confirm the process by clicking Uninstall again.
There’s another way on how to uninstall Skype on Windows 10. This is through the Control Panel. The steps can be found below:
- Launch The Control Panel. The first thing you have to do is to open a folder in Windows 10. Any folder will do. Then, type in Control Panel in the address bar. Push Enter afterward.
- Go-To Programs. The next step is to go to Programs. After that, visit the option for Programs and Features.
- Find Skype For Business. Find the app that says Skype For Business.
- Click the button for Uninstall at the top.
- Follow Prompts. Finally, follow the prompts on the new window that appears. This will finish the process on how to uninstall Skype for Business on Windows 10.
Here’s how to uninstall Skype for Business via the Registry:
- Launch Start Menu. Open the Start menu and then type in “Registry Editor”. Right-click the Registry Editor app that appears and clicks Run As Administrator.
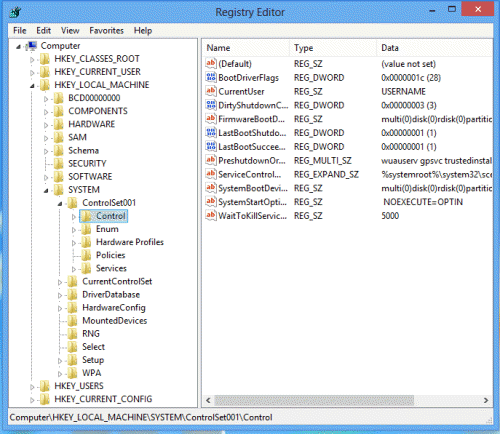
- View The Right Key. The next step is to view the registry key labeled “HKEY_LOCAL_MACHINE SOFTWARE Microsoft Windows CurrentVersion Uninstall”.
- Select Skype. Then, you will have to select the folder of Skype.
- After that, you have to double click the registry setting labeled “UninstallString”.
- Copy Its Value. Now, make sure you copy the value that is filed. After that exit Registry Editor.
- Go Running. Next, you should visit the Start menu and then type Run. Click the app “Run” that appears in the search result.
- Paste Copied Value. After that, paste the value you have copied within the text field. Then, press OK.
That’s how to uninstall Skype for Business on Windows 10. As you can see, there are three options. The first is through Settings. The second option is through the Control Panel. Finally, you can also use the Registry Editor and the Run apps.
Part 3. Best Way To Uninstall Skype For Business From Mac
What’s the best way on how to uninstall Skype for Business on Mac? This is through the use of PowerMyMac on your computer. It’s a tool that’s very useful for removing apps from your system. In addition, it helps to remove unwanted files. Here is an example of deleting files on the Mac. This helps to clean up your system. In addition, it boosts the performance of your Mac and makes it faster.
Here are the steps to use PowerMyMac on how to uninstall Skype for Business on your computer:
Step 01. Download And Launch The Tool
The first step is to download from PowerMyMac.com. You will see there are two options, a free trial, and a purchased version. Once the installer is downloaded, launch it. Then, open the installer and follow the prompts on the screen. After that, launch PowerMyMac.
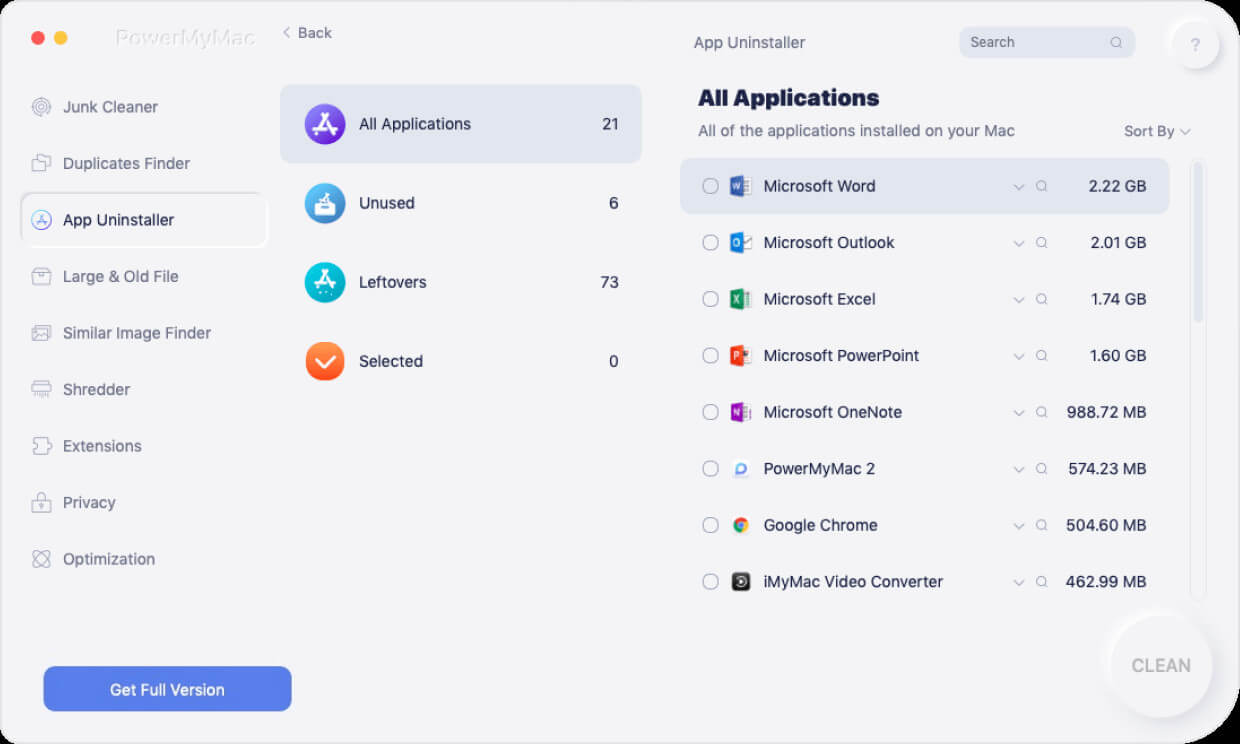
Step 02. Click The Uninstaller Module
The second step is to click the Uninstaller module on the interface. This is found on the left sidebar. After that, you can now click the Scan button. This will scan your entire system for all installed apps.

Step 03. Find Skype For Business
Once that is done, you can simply find Skype for Business in the list that appears. Once you select it, you will find all its associated files and folders on the right side.
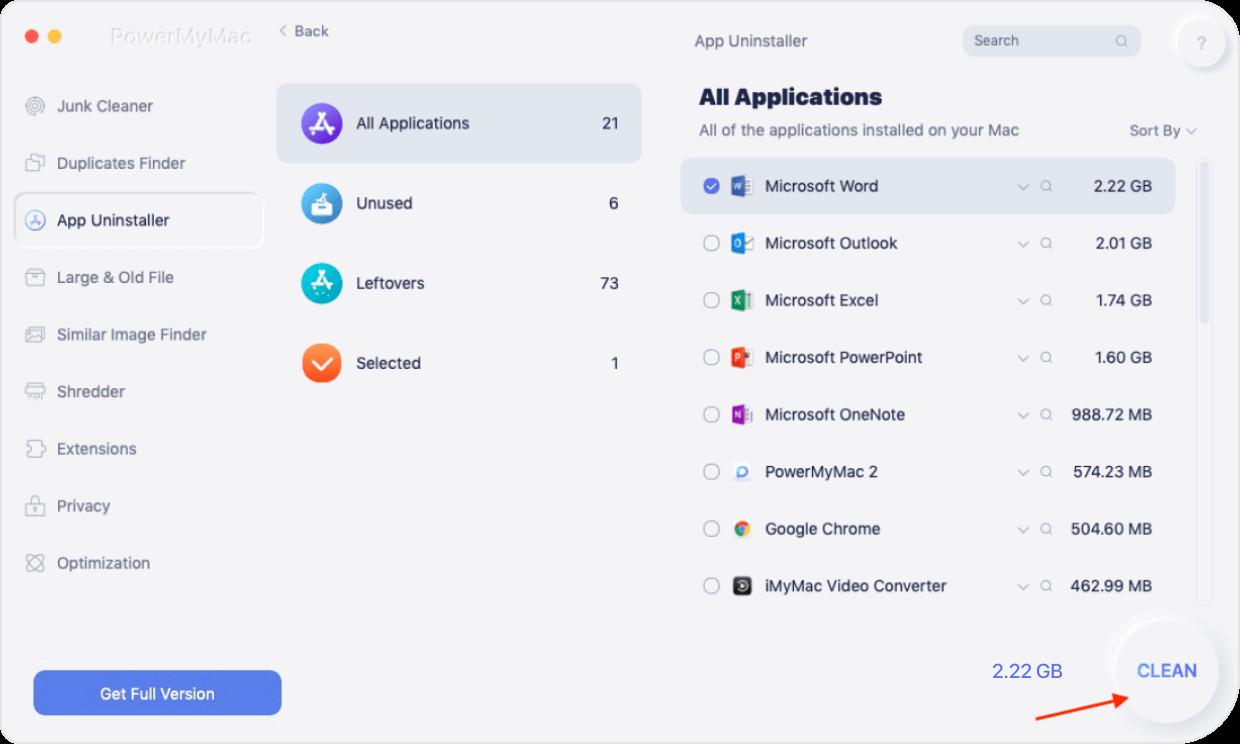
Step 04. Click the Clean Button
Click the Clean button in order to implement how to uninstall Skype for Business on Mac. This will take a few seconds to a few minutes only. The interface will show that the Cleanup is Completed after the process is done. Wait for this to be displayed.
We have given you the top guide on how to uninstall Skype for Business on Mac and Windows 10. The first thing we told you is how to stop it from running in the background. Then, we moved on to manual methods of uninstalling the app on Mac and Windows 10.
If you’re a Mac user, you will notice that removing apps is hard because leftover files are kept. That’s why we recommend that you use PowerMyMac in order to uninstall apps including Skype for Business. It’s a great way to keep your Mac optimized. Get it today!


