
Have you recently noticed that your Mac is running slower than its usual performance? If so, then you might have a lot of files stored in your Mac. And one of the files that you should consider cleaning up is the biggest and old files that you no longer need. This way, you will be able to free up space on your Mac and at the same time, you will be able to make its performance a lot better. For those who don't know where they are, We are going to show you how to find the biggest files on your Mac.
But there is just one problem though. And that is not all Mac users know where they can find these files on their Mac, not even you. So, if this is the same as your dilemma, then you have come to the right place because we are going to show you different ways on how to find the biggest files on your Mac and remove them. Because we know that doing this process will help your Mac to perform better and at the same time, to have more space for new and more important files that you need.
So, go ahead and read through this post and we can assure you that after reading this, you will be able to know how to find the biggest files on your Mac easily, effectively, and quickly. Just simply choose from the listed solutions below.
Part 1. How to Quickly Find the Biggest Files to Delete
Of course, the best way on managing your Mac should also be the easiest way possible. And when it comes to managing space on your Mac and removing all the files and other things that you no longer need, there is only one tool that is powerful enough to do all this at once. And that is no other than the PowerMyMac.
The PowerMyMac is known to be the most powerful tool that you can use for you to optimize your Mac and at the same time, speed it up. The PowerMyMac comes with tons of features that you can all use to manage your Mac. By using the PowerMyMac, you can clean up all of your junk files, delete all the apps that you no longer need, speed up the performance of your Mac, it can manage those external drives that you have, and it will certainly protect your important and confidential files.
This tool is very easy to use and safe as well. It will only take a few clicks and you will be done in no time. And by using the PowerMyMac, you will be able to know how to find the biggest files on your Mac easily. No need to go through all of your files on your Mac just to find them. And with all that being said, here is a quick guide on how to use the PowerMyMac. Go ahead and download the tool, install it on your Mac, and follow the steps below.
Step 1. Launch PowerMyMac on Mac
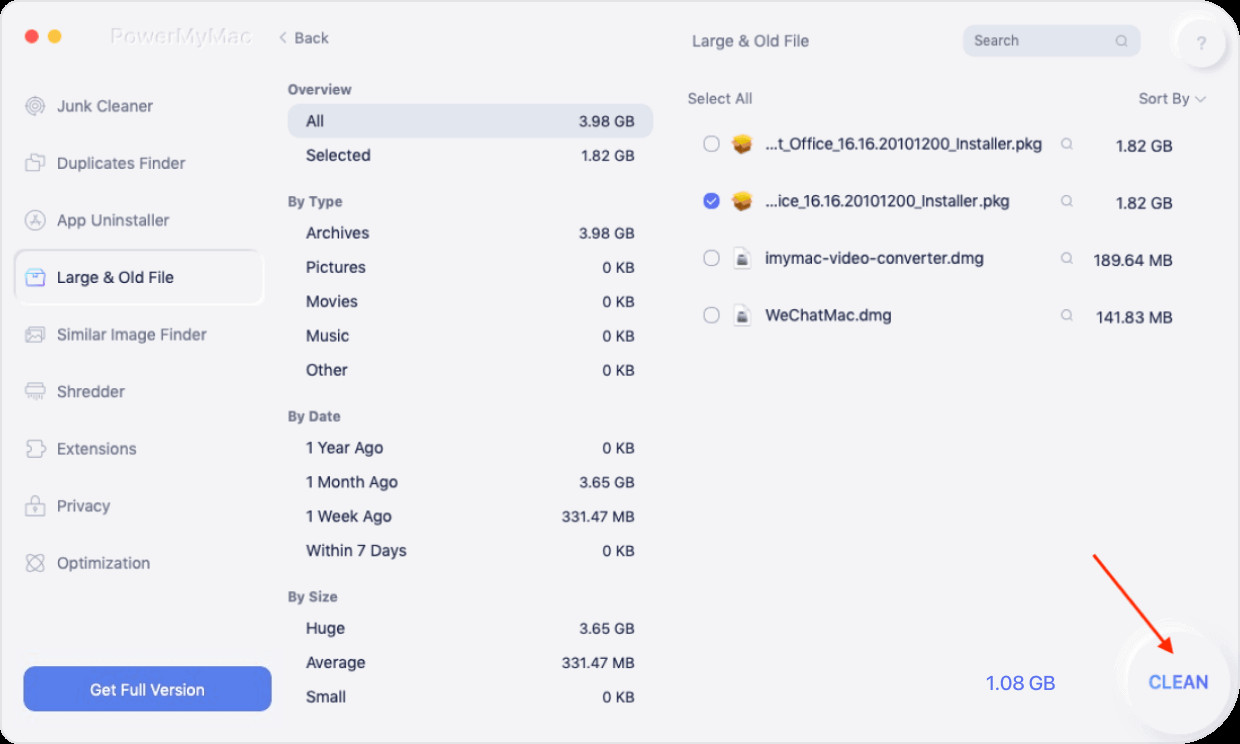
Step 2. Choose Large and Old Files Category, and then scan them

Step 3. Clean up Your Large and Old Files
Part 2. How to Find the Biggest Files on Your Mac Manually
Now that you know how to find the biggest files on your Mac and deleting them the easy way, it is still a good thing that you also know how to find them manually. And with that, here are some other ways on how to find the biggest files on your Mac manually.
How to Find the Biggest Files on Your Mac Using Hard Disk Management
The Hard Disk Management is one feature that comes along with the macOS Sierra and other later versions of Mac. This tool has also different usage that you can take advantage of. Some of its functions are transferring data to your iCloud, cleaning up your Trash Bin, reducing the cluttered files and folders, and optimizing the storage space on your Mac. This tool is also one great way on how to find the biggest files on your Mac easily and some other data. So, if you are using a macOS Sierra or a later version, then you can go ahead and take advantage of this tool. Here is how to use this tool.
- On your Mac, go ahead and hit on the Apple logo from the menu bar.
- From there, go ahead and click on the option About this Mac.
- And then, go ahead and click on the Storage tab and then click on Manage…
- And, on the new window that will show up on your screen, go ahead and find the option Reduce Clutter and then choose Review Files.
And after that, you will be able to see different categories of data that you can manage. From here, you can go ahead and choose the category you want to work on with and then choose the biggest files that you see on your screen. Then, you can simply hover your mouse on the file and then click on the X button if you want to remove it from the list.
How to Find the Biggest Files on Your Mac Using Terminal
If you are very familiar with your Mac and with the different commands that you can use to find files, then you can go ahead and use the Terminal program. Here is how you can do this.
- Go ahead and launch Terminal on your Mac by pressing the Command + Spacebar on your keyboard. Or, you can also click on the utility folder and then choose Application using Finder.
- And once that Terminal is launched, go ahead and enter this command: Sudo find /-type f -size +100000k -exec-ls -LH {} \; | awk ’{print $9 “.” $5}’
- After entering the command, you will then be able to see on your screen different path that comes with the size of the files. Here, all you need to do is to press the Return button on your keyboard.
- And then, confirm the action by using your admin account and password.
- And if you want to remove some files that you no longer need, just go ahead and use this command: rm “path”.
How to Find the Biggest Files on Your Mac Using Finder
Another tool that you can use on your Mac is the Finder which is a built-in feature on your Mac. And to know how you can use this, go ahead and follow the steps below.
- Go ahead and launch Finder on your Mac by going to your Utility folder.
- Once that Finder is up and running, go ahead and press the keys Command + F.
- And then, you will be able to see another window on your screen. From there, go ahead and choose Kind and click on Other.
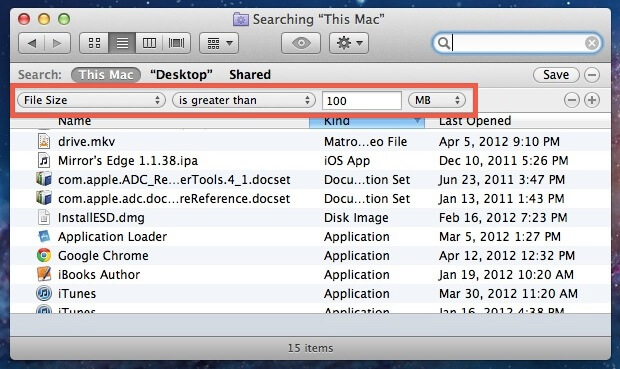
- From here, you will be able to see all of the biggest files that you have on your Mac. Just go ahead and click on File Size.
- And then, go ahead and select the parameter that you want to work on with. In this case, go ahead and click on “is greater than” option for you to find the biggest files on your Mac.
- And from there, you can now be able to see all of the biggest files that you have stored on your Mac. Here, you can also choose those large files that you no longer and delete them if you wish to do so.
Part 3. Conclusion
Knowing how to find the biggest files on your Mac is one way for you to be able to see which files need to go. This way, you will be able to free up more storage on your Mac for you to save new files. Also, doing this can save your Mac from working slowly. And as you can see, there are different ways on how to find the biggest files on your Mac. Thanks to all of the built-in tools that come with your Mac, you will be able to get this job done easily.
However, if you are truly aiming for is knowing how to find the biggest files on your Mac the easiest and the most effective way, then using the PowerMyMac tool is the best solution that you can apply. This way, you will be able to find all of the biggest files on your Mac quickly, easily, and have them remove if needed. Plus, using the PowerMyMac will ensure that you are going to get more storage space on your Mac and at the same time, to have your Mac working smoothly without needing to experience it being slow and faulty at times because of those large files that you have.


