
We all know that having backups of the data on our devices is one great way of keeping them safe. So that once that something happens to your mobile device, you will always have a copy of your important data saved on your Mac. And backing up mobile devices once in a while is one good idea.
However, the too many backups stored on your Mac can eat up a lot of space and you might find some trouble working on with your Mac as well. As soon as they pile up on your Mac, the sooner your Mac will be out of storage space. So, here in this post,we are going to show you how to delete backups on Mac.
Backups on your Mac can be harmless at first. And at the same time, it can be very helpful with all its users because they will still have a copy of their files no matter what will happen to their device. Especially if they have super important data stored in their device. A lot of people often do backups as often as they can. But once that these backups get piled up, then the problem will occur.
You will then experience a lot of errors on your Mac and as well you can also have a hard time using it because of these piled up backups on your Mac. That is why what we highly recommend you to do is to delete those backup files that you no longer need and you think just laying in your Mac and eating up space. This could cause your Mac to run slower than a turtle and running out of storage space.
That is why we are going to show you in this post some ways on how to delete backup on Mac easily. So, if you want to know how you can do this, go ahead and read through this post and you will surely know how to delete backups on Mac.
Part 1. The Best Way to Delete Backups on Mac
Deleting backups on Mac can make your system free from all the burden of running slow. However, it's not that easy to delete backups that you no longer need and use on your Mac. That is why we are recommending you to make use of one tool that is so powerful that it can help you get rid of those unneeded backups on your Mac. And that is no other than the PowerMyMac.
The PowerMyMac has the power to remove those backups that you no longer need. Plus, it can easily help you in boosting up the speed of your Mac’s system. And aside from the fact that you can delete those unwanted backups on your Mac, you can also delete some other files such as your junk files, caches, and as well as applications that you no longer use on your Mac. And aside from that, you can also protect your private files so that no one can access them aside from you.
And the best thing about using the PowerMyMac is that it has a user-friendly interface that can make every user use the tool easily. Plus, it is very convenient to use and safe as well. And to show you how you can use the PowerMyMac to how to delete backups on Mac easily. So go ahead and download and install the program on your Mac and let’s begin.
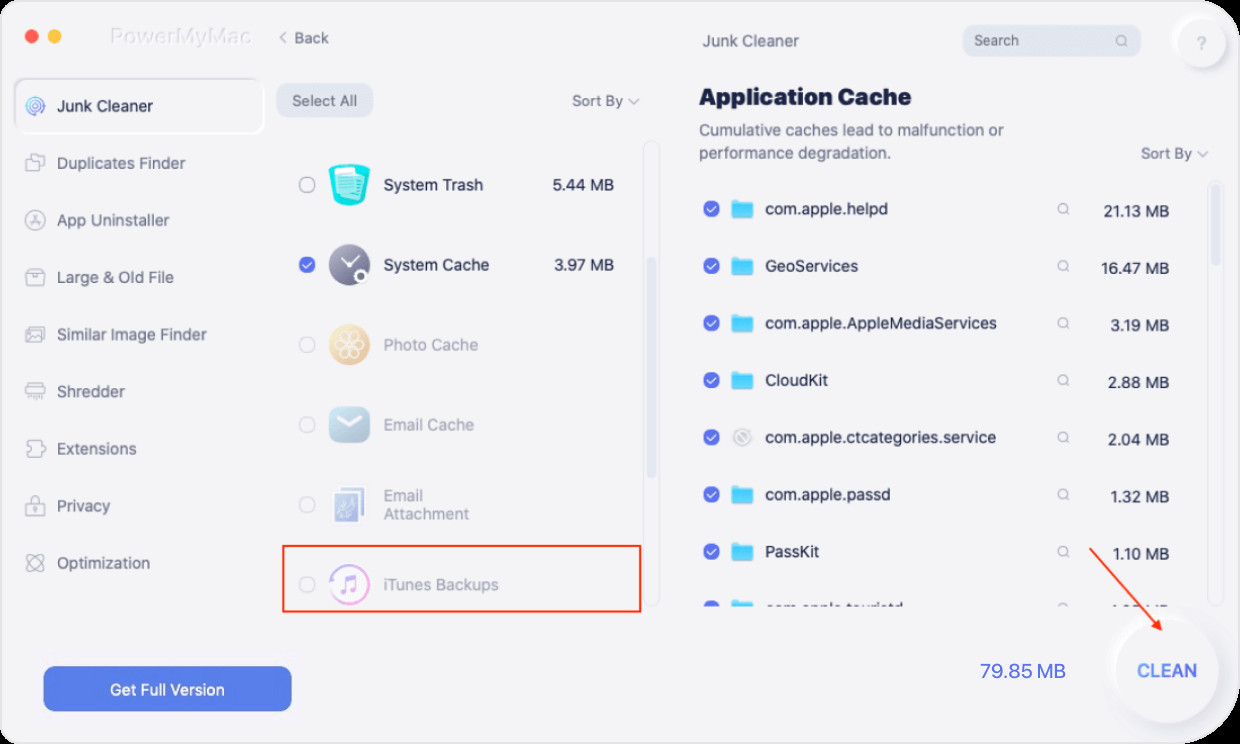
Step 1. Start PowerMyMac and check the system status

Step 2. Choose Master Scan, and scan your iTunes backups on Mac

Step 3. View your backups on Mac
Step 4. Delete chosen backups
Once that you are satisfied with the backup files that you have chosen, then it is now time for you to delete them. And for you to do this, go ahead and simply click on the Clean button below your screen to continue deleting your chosen backup files on your Mac. Now just patiently wait for the whole process to complete.
Part 2. How to Delete Backups on Mac Using Finder
Another way on how to delete backups on Mac is by using one built-in tool on your Mac as well which is called the Finder tool. And here is how to do it.
- Go ahead and launch the Finder app from the Dock of your Mac. You can also find it on your menu bar at the top of your screen.
- And then, go ahead and connect your external hard drive to your Mac and wait for the system to recognize it. You will know that your Mac recognizes it if it will appear on your Devices tab from the left side of your screen.
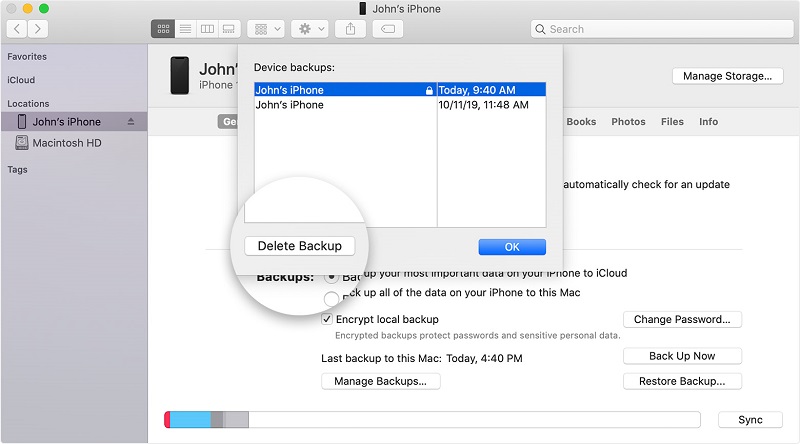
- Once that the device was detected, go ahead and click on Backups.backupdb from your drive.
- And then, click on the folder that has the name of your Mac.
- And then, you will be able to see more folders under it. From there, go ahead delete all of the files that are connected to your Time Machine backup that you wanted to get rid of. Do this by right-clicking on them and then click on the Move to Trash option.
- And after that, go ahead and launch your Trash Bin and then empty your trash so you could completely get rid of them from your Mac. Just do this by simply clicking on the Empty Trash option.
Part 3. How to Delete Backups on Mac Using Time Machine
Time Machine is also another built-in application that you can use for you to delete all of the backups that you have on your Mac. And with that, here are the steps that you need to follow.
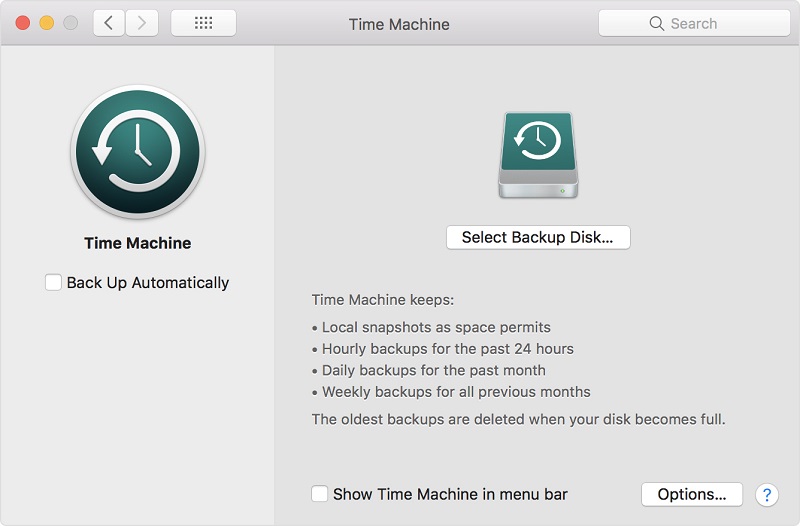
- Go ahead and have your external drive be connected to your Mac and wait for it to be detected.
- And then, go ahead and choose Time Machine located at the upper part of your screen in the menu bar. You can also launch your Time Machine using the Spotlight feature which has the magnifying glass icon.
- And then, go ahead and look for the backups that you want to remove from your Mac.
- Then, simply click on the gear icon and then choose the Delete Backup option from there.
- After that, go ahead and agree on the confirmation command and question on your screen.
- And then, go ahead and key in your password for you to confirm the process.
Deleting Your Time Machine Snapshots
Just a follow up when it comes to deleting your Time Machine backups, you might also need to remove those snapshots as well. These snapshots are made every time your Time Machine is running a backup. That is why it can also be considered that you delete them from your Mac. And for you to do this, here are the steps that you need to follow.
- Go ahead and open the Terminal tool on your Mac.
- And from there, go ahead and key in the following command: tmutil listlocalsnapshots /
- Then, you will be able to see there all the snapshots that you have that comes with a name of “com.apple.TimeMachine.2017-11-17-002012”
- And for you to remove the snapshots, go ahead and enter sudo tmutil deletelocalsnapshots and then the time or date of the snapshot to delete.
- And then, you will be able to see there: Delete local snapshots ‘2017-11-17-002012’ from your Terminal. This only implies that that the snapshot you have chosen was successfully deleted from your Mac. Go ahead and do step 3 again for the other snapshots that you want to delete from your Mac. Only that you are going to change the date area.
- And if in case that you no longer want your Time Machine to do some local backups on your Mac, just go ahead and key in the following command: sudo tmutil disable local
Part 4. Conclusion
Backups stored on your Mac can be seemingly harmful to your Mac. But once that it gets piled up since the day that you start backing up your data, then the problem will then increase and can be worst once that it gets full.
That is why deleting them from your Mac is a good way for you to save up more of your storage space on your Mac and at the same time, you will be able to boost up the speed of your Mac. That is why we recommend you to clean them up. And that is why we have come up with all of the solutions above on how to delete backups on Mac the easiest possible way there is.
But if you want to make sure that you are going to delete your backups on your Mac safely and effectively, then we highly recommend that you use the PowerMyMac tool. As this is known to be an all-in-one tool that you can use on your Mac not just only to get rid of unwanted backups, but also with those unwanted programs, files, and applications that you no longer need on your Mac. This way, you will be able to free up more storage space and boost up the speed of your Mac in just a few clicks. It is a safe, effective, and very convenient tool to use.


