
Macs are assumed to last for a long period of time. Users are most likely to switch a Mac if that is too old to address the increased update including the file system that is going to break down. However, when you decide to change the Mac, you would like to ensure that you clean all the confidential data safely until you recycle and even sell it.
This means that once you delete the files it cannot be retrieved by another user. This article will address your question on how to securely delete files on Mac completely. The ability to safely remove data on the computer alters on what you are using a standard external hard disk drive (HDD) or even a solid-state disk drive (SSD). You don't really have to remove SSD data safely.
Part 1. Why Should You Securely Delete Files on Mac?
There are benefits and drawbacks to just about everything, as well as the reliable deletion of your documents files, it must be a prime concern. This might seem surprising to actually remove the data file because there will be a possibility which you might wish them back, and yet look in that quick example what if you want to save more space on the drive, but you really don't understand exactly what to do about it? Safe removal is coming to action here. Here are more explanations why you must need to understand the safety deletion of files on your Mac.
Reliability
Not only does it erase registry file names, it often extracts data many times before all of them can be retrieved. All this implies is that the normal retrieval methods do not work here.
Versatility
Refuses the need for users to buy third-party applications to safely remove content.
Security
Complete removal of databases clearly indicates that you don't even have to complain to other people within that being inquisitive able to retrieve someone important documents, no matter how geek they are.
Preventing Hard Drive Failure
Often manually formatting your drive will lead to errors that add up to destroy your drive. It's safer to adopt a quick method to safely uninstall data that you don't use. This means that the move is running efficiently
Tips: Have you ever encountered a file extension called temporary files? should you delete them? are they slugging your mac? if so, then follow this guide on how to delete temporary files on your mac.
Part 2. How to Securely Delete Files on Mac Using Terminal?
Using the command line to easily delete the files on the directories is through the "Srm" key. The Apple company dropped this script on macOS Sierra because of the same purpose this secure Empty Trash feature was being disabled. You can do all of this, by the use of the "rm" command inside the terminal. It can erase files and directories from the Mac using this button.
However, it can also be used to uninstall data files safely. It can be accomplished simply by opening the directory via Finder in Terminal instantly through the default. Here’s how to securely delete files on Mac using the Terminal program. Follow the steps below.
- Go and click the Apple icon in the dock of your Mac computer.
- Click on the System Preferences.
- Select the "keyboard" icon.
- Select Shortcuts at the upper edge of the dialog box.
- Turn left and press the "Services" button into that little panel.
- When the New Terminal at folder is unchecked in the "Services" tab, search it out.
- Launch the Finder window.
- Select the folder in which the data to be erased have been securely stored.
- Right-click the document, but then don't open this.
- Tap on the Services on the drop-down screen you have.
- Within the next drop-down panel, press the New Terminal at Folder.
- Enter the following command line if prompt, install the new name of the file with the filename you need to delete: rm -P PrivateFile.txt
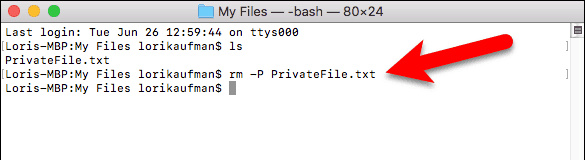
The command which allows users to safely completely remove information on your Mac is labeled rm. This has a statement named “ P which just overwrites the information thrice to make it difficult to access your documents.
You don't really have to dig deeper and find out more about the command you want to use. The most you can do to understand exactly would be that the command would then ensure that your files are deleted safely but mostly can't be restored throughout the long run.
How to Securely Delete Files on Mac Using Terminal?
One of the methods on How to Securely delete files on mac is to use the Terminal application on your Mac device. A quite normal action to do but not widely recognized, here is to completely remove a single file from your Computer. Dropping a document to the Trash ensures that it's already there and can be recovered at any moment, never to mention getting up too much space. The minor issue with Trash is that even if you decide to erase a single file from it, for example permanently removing it, you need to uninstall everything. And in this situation, if you have only one file to uninstall.
But, although you haven't tried the command line, Terminal may often be risky. Until accessing it, get acquainted with some common terminal instructions, as any incorrect command you execute will do harm to your device, but you could probably uninstall documents quicker than you might have had time to interrupt the operation. Now head to the terminal then conduct the easiest commands. Follow the steps down here to learn How to Securely delete files on mac.
- Go to the Finder application located on your dock.
- Click on the Application then next is utilities and then you can go now to the terminal window page.
- The command line with the $(dollar sign) would then show on the latest pane. The command line you'll need are ComputerName: CurrentDirectory ~Username$ as well as the term Bash near the top, which would be the terminal language here on Mac.
- Input the command then click the Return button for each command to activate it, either cut / paste the command to the terminal pane. Enter rm and space, and afterward click and drag whatever file that you would like to delete completely from the terminal program. Click on Enter to delete this file permanently.
Part 3. How to Securely Delete Files on Mac with Built-in TRIM?
If the Mac worked at an SSD before you purchased this, so it came along with an advanced device named the TRIM. If you uninstall the document either from the drive (HDD or SSD), mac identifies the storage to "not in usage." Mostly on SSD, the TRIM command will immediately trim the data in the specified area. Which helps the SSD to read from and write to the storage as though it had never been used.
Users may allow TRIM manual process with "trimforce" command. The Apple advice using this TRIM "may lead to accidental loss of data or data theft." Apple doesn't really recommend the usage of the TRIM method and warns everyone to do it at your own threat.
When you make a choice to allow TRIM, you should be using Time Machine or some other backup method to support the computer initially. Here’s how to securely delete files on Mac with the built-in trim.
- Start of "Terminal."
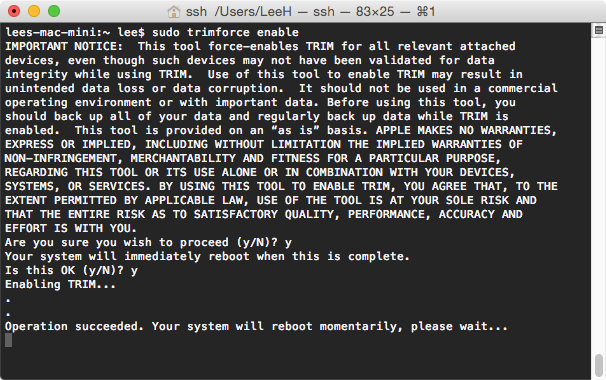
- Enter this command to allow TRIM: sudo trimforce enable
- You can see a request asking about the plans to start the operation. Type y at the terminal.
- Click on the "Enter" button.
- Just type y again.
- Click "In" again now. The above informs Terminal that you could always restart your computer that once TRIM is enabled.
This is it. You now know how to securely delete files on Mac with allowed TRIM and perform the task of cleaning empty space inside your drive.
Part 4. How to Securely Delete Files on Mac via Encrypted Disk Image?
In Mac it mainly comes from disk files .dmg file extension. Dmg documents are perfect as they allow you the ability to load and upload your data on the network quite easily. One of several mechanisms of the disk image would be to safely erase your files and documents. This same method could be relevant to you, but again, since you need to transfer the files to the hard disk to be removed. Then you make it permanent and erase everything.
The main objective of doing everything is when the hard drive encrypts the documents, these are unrecoverable. And consider making sure that the content on the disk is locked already when you remove the documents. Removing them when it's still accessible would just transfer them into the Junk disk. Here is what you've got to do to start making the data encryption.
- Launch the "Applications" window.
- Press the button on the "Utilities" tab.
- Select the "Edit" icon.
- Click on the "New Image" icon in the drop-down list.
- Within the next menu, hit the Blank Image.
- The new command prompt will be opened. Input any label for both the disk image throughout the "Save As" file. But remember to add the extensions ".dmg" format at just the end of the term.
- Pick "Where" then choose the directory to store the image document.
- Name the file.
- Clearly state the "Size" for the file type, then leave the space to select KB, MB, GB or TB
- Pick Encryption you need to do so since you decide to encrypt a disk file meaning that you need the authorization to access it.
- Choosing the correct "Encryption" option would open up a screen that asks you for something like a key. Click the key twice.
- Select the "Choose" tab.
- Click the 'Save' button.
- When the action is performed effectively, click "Done."
- A new disk picture you have already generated would show in the "Disk Images" tab of the File Utility. Dual-click this page
- The certain folders or data files that need to be removed must be relocated to the newly formed image file.
- Right-click on the logo of the picture format.
- Select "Eject" to remove the disk picture and also to activate it.
Part 5. Securely Delete Files On Mac With PowerMyMac
File shredder is indeed a tool that can permanently remove files from your computer, so you won't be worried if someone tried to restore it sooner. This one has been identified as a secure, reliable, and quick resource for breaking confidential material. It erased 100% of the protected-to-delete files. Inspect data in detail before deleting. Learn how to securely delete files on Mac use this tool.
Shredder under the toolkit module of the PowerMyMac application allows you to show all the specific details of your data and makes you fully delete the data from your Mac. Here’s how it works
Delete Files Forever with PowerMyMac’s Shredder
Step 1. Choose Shredder under the Toolikit Module

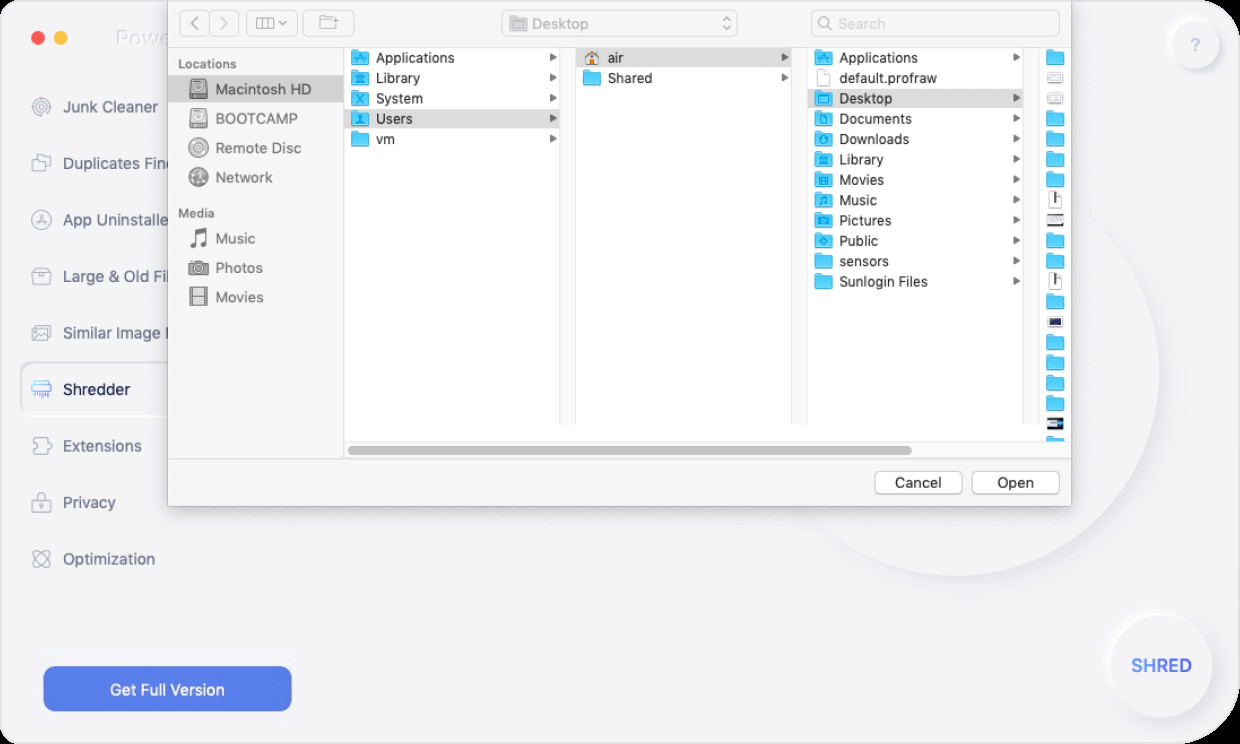
Step 2. Select Files
Select files to be erased. Then click the Open button.
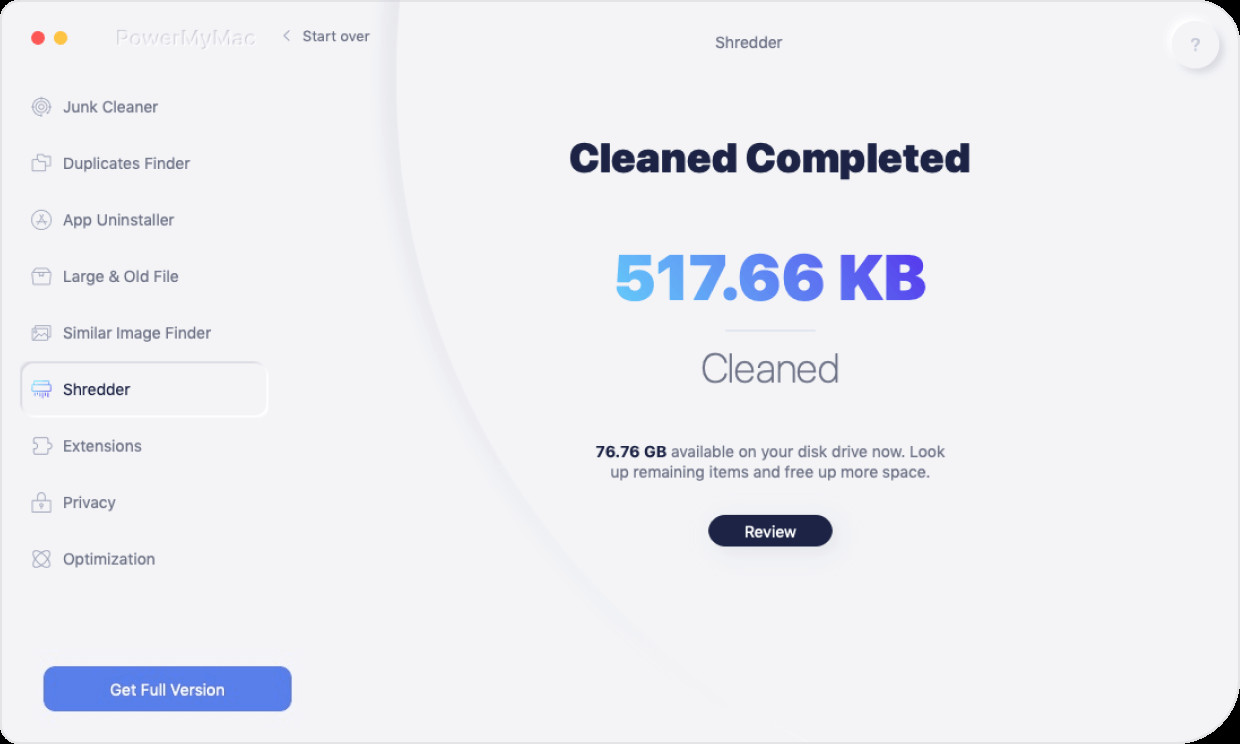
Step 3. Clean Files

Step 4. Files are erased forever.
Part 6. How to Recover Deleted Files on Mac for Free?
Usually, deleted files of Mac drive are mostly placed in the trash can, through which you can recover them quickly. When you have cleared the bin, you could recover lost data on Mac without software through time machine transfer files, undo methods and terminal commands. If all these four ways can be inaccurate, please don’t distress yourself. You could even seek an efficient method to retrieve permanently encrypted data on your computer.
Fill out all the information below and uninstall computer data. Below are the steps to be followed while trying to restore deleted information without tools. You may want to pursue any of these approaches before utilizing a tech solution.
- Recover files from the Trash bin on Mac by using the "Put Back" method.
- Launch the Trash Can on your computer by clicking the icon of the Trash Can.
- Find the option that you'd like to access.
- Right-click on the folders you want to regenerate.
- And then choose Put Back to retrieve encrypted data from the Trash towards its current position on Mac.
- Recover destroyed files through time Machine Backup.
- Retrieve deleted items with Undo Mode.
- Recover deleted items on your Mac using the Terminal application on your dock.
- Use your highly qualified-Mac data retrieval Service.
There are many applications that help you to remove files safely. We're going to give you one free software Version that you can use to securely delete files on Mac.
Permanent eraser (free of charge)
Permanent Eraser is really a free downloadable software that helps you to easily remove files with one of many deleting ways, such as 3-pass DoE or 35-pass Gutmann. The software readily files several times, spins the initial file names, even modifies the file amounts to none. Just after doing all this, Permanent Eraser can deactivate files from your device.
Part 7. Conclusion
As we mentioned above, If you really don't understand how the document deleting method functions with your Computer, then you may want to learn on how to securely delete files on Mac. when you remove your data, they're gone for good.
For most of the instances whenever you uninstall a file on your Computer, your Computer can just erase the connection to your device. The file you removed appears to remain on your computer, but without any connection to it. You can also use a tool like the PowerMyMac to easily recover and securely delete files on Mac.


