
If you take a look at how much available disk space you've got on your Mac, you’ll find that there’s a chunk of space that isn't always directly free, however, it is still available to applications on Mac, known as Mac purgeable space. The purgeable space generally comprises of local snapshots and additional caches, sleep pictures, change documents, and different brief files. So keep reading to learn how to clear Mac Purgeable Space.
When the application requests the greater disk space that is directly free, the system automatically and immediately restores the related quantity from the purgeable space on your device. The system calculates the current quantity of the purgeable space directly inside the history, and regularly there may be important to put off between the movement and the impact of the purgeable space, from seconds to limited counts.
Part 1. What Does Purgeable Space Mean on Mac?
It is a space that the system can automatically be accessible when it’s chosen. The files that invade the purgeable space saved on your iCloud drive. They exist in designated locations for a purgeable status because they are no longer used recently. It also implies the specific characteristic of the storage space on your Mac systems. Starting with the Mac Sierra.
The Apple company brought a brand new class of the storage space that can be observed if you view the system’s storage of your device. It can be visible if you turn it on. Erasing these files will no longer have an instant effect on your system, they can be downloaded once more when needed.
Your running system will take care of the deletion of purgeable data within the history even without a user's participation. There can be instances when you need to manually clear purgeable space on Mac. These what Mac purgeable space means.
How to Clean up Storage on Mac?
The storage space frequently comes at a top-rated on the proper use of the Mac computer systems. In case you can use the system to save the pictures, videos, and different media documents it may quickly emerge as it is difficult to locate extra space on your Mac's not internal drive.
It is the same with the builders who are probably looking to check barriers among their software program equipment. Organizing and optimizing the storage of your Mac can move a protracted way delivering you a room to respire.
You can choose from the four alternative options in which it can be available if you select to organize the computer’s storage. The 3 primary steps are all you need to do so that you can view how the storage is presently assigned to your connected storage devices.
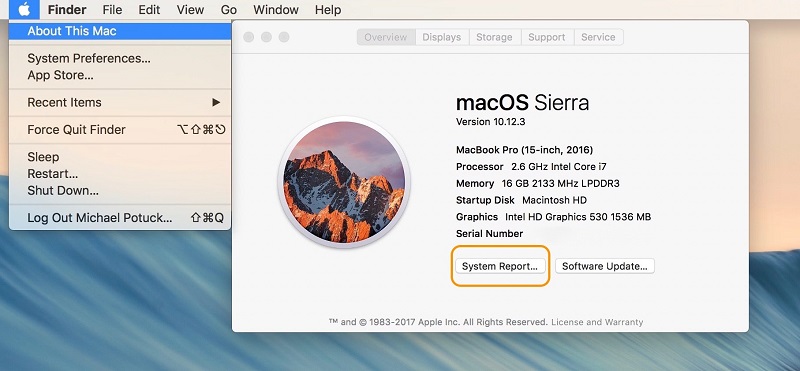
- Click the Apple menu in the dock of your device.
- Choose About this Mac.
- Click the Storage tab.
- Then click the Manage button.
- Choose the Recommendation on the list.
You now have the entry to the several options to help you manage the storage.
Store in iCloud
Choosing this feature will save the area for your drive using storing the older and the less newly used images, files, messages in the iCloud, and installing it when you want them. Most current files and optimized pictures are stored on your device saving it to your storage space.
Optimized storage
Once you choose this item, the purgeable type might be introduced for your storage analysis and once you click on the Optimize storage button, you could choose to keep storage with this particular technique.
- It will remove all the watched iTunes movies and shows.
- We, Will, download only the most effective current mail extensions.
- Don’t automatically download the attachments. Attachments are in handiest downloaded if open an electronic mail or in the attachment.
Empty trash automatically
You could establish to automatically eliminate quantities from the Trash after 30 days. So if you have this feature set, it'll display as ended within the storage management program. To set this feature here how to do it.
- Open the Finder on your Mac device.
- Then choose the Preferences on the Finder.
- Then select Advanced.
- Mark the box to choose Remove Items from the Trash after 30 days. And you're all done.
Reduce Clutter
Connecting to the review files button, it will bring you up to the window wherein you could evaluate all the documents and programs that can be present to your Mac. Select the kind of document you're inquisitive about, and choose it inside the sidebar. You can build the documents through the size, type, or previous date and decide in case you need to delete them to loosen up a few spaces for your storage device.
These are all the things to do to clear Mac purgeable space.
Part 2. How Do I Clear Purgeable Space on Mac?
There's also another method to save the space of your storage like the PowerMyMac cleaner tool. This tool can help you to free up the storage space of your device. The good thing about this application Is, it can be used to clean all the junk files or unwanted files you have on your Mac to free up the space of your Mac. It will help you optimize and completely clean your device. Here’s how it works.
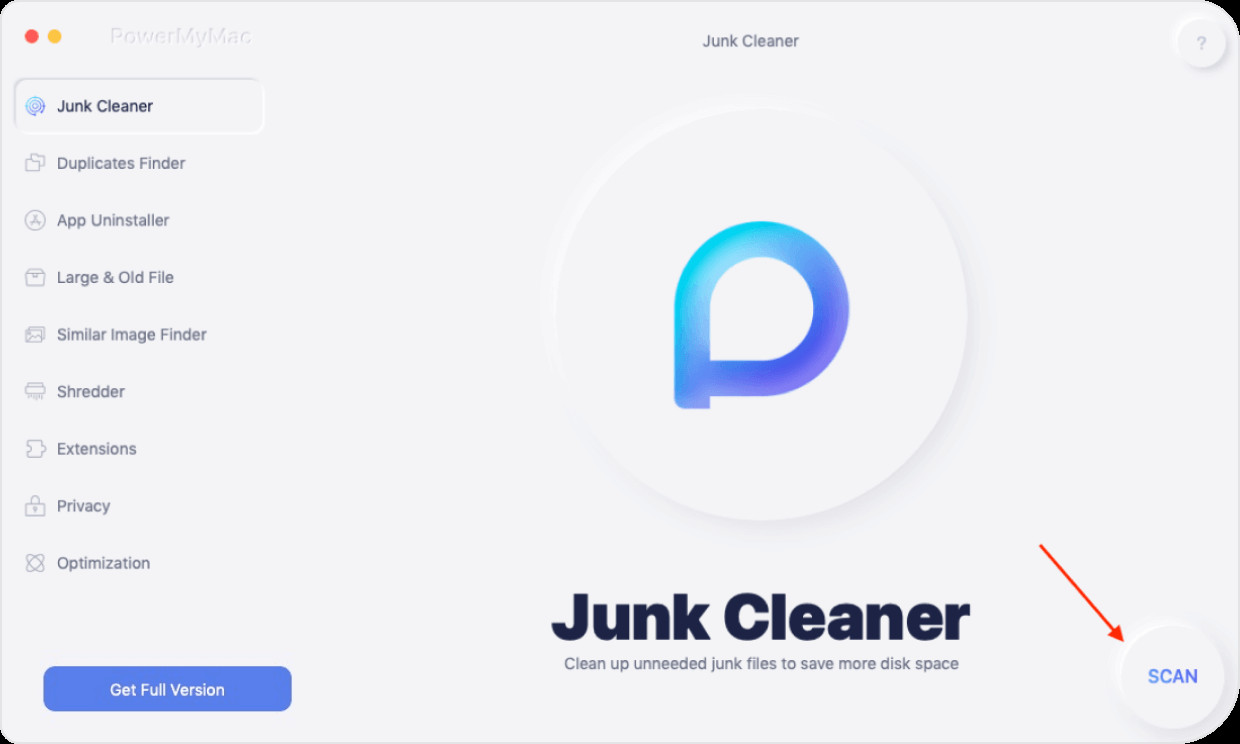
Step 1. Launch the PowerMyMac application
Step 2. Select the Junk Cleaner, then scan the system junk
Step 3. View the result, locate and choose which files to delete.
Step 4. Mark all the files you want to clear and click the CLEAN button to complete the process.
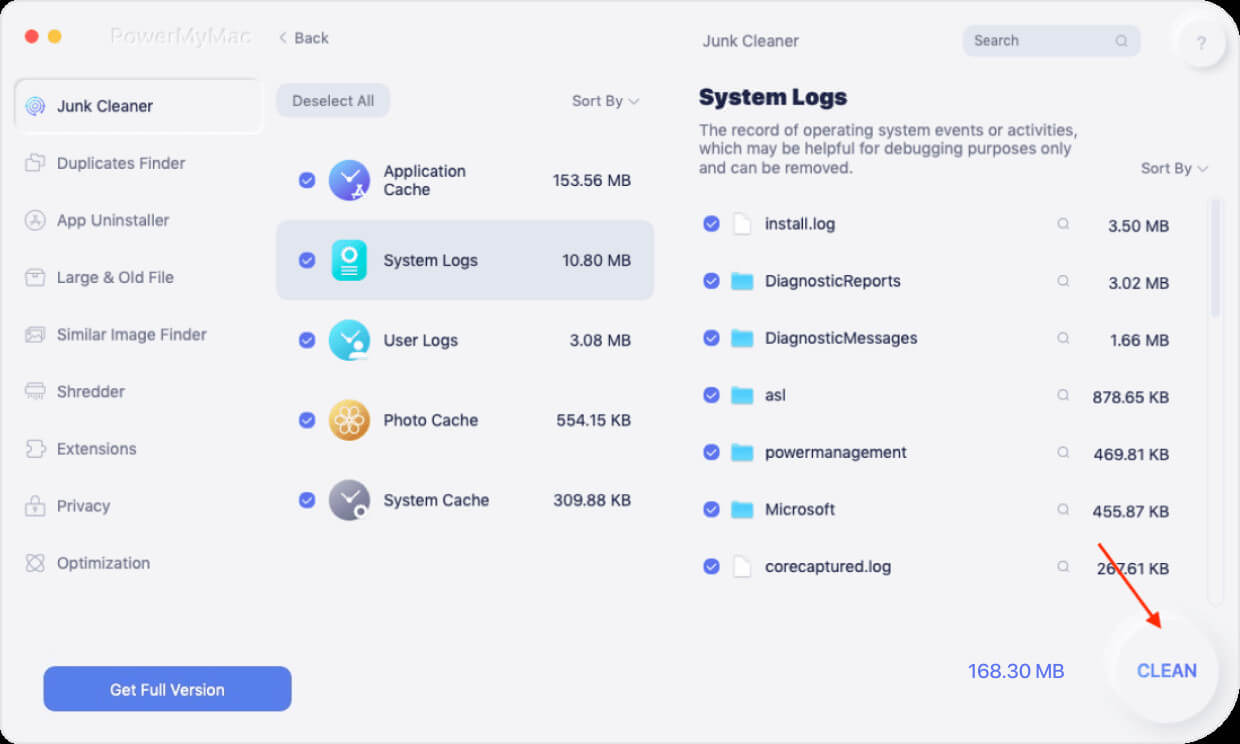
That’s it you can also remove the photos, email, and other related files that Mac purgeable space occupied. And you’re all done. And you can now clear purgeable space on Mac completely by using the PowerMyMac tool.
Part 3. How to Clear Purgeable Space on Mac with Terminal?
You could also force your Mac to clear purgeable storage, try to download, or set up a large file. It can be difficult to find a huge sufficient file to fill your Mac’s disk, but you could simply create one for yourself. This technique is by using the Terminal window, you might also skip this method in case you aren’t comfortable using the Terminal commands. But in any case, it’s effective. These commands can be risky. Ensure to copy and paste these commands or you can type them exactly as what it seems. How to clear Mac purgeable space using the Terminal read down below.
- Go to the Terminal application on your Mac device. Or type it into the spotlight search bar.
- Type this command “mkdir ~/large files” in the terminal window. Then click on “Return”
- Type this command:dd if=/dev/random of=~/largefiles/large files bs=15m. If you’ll notice that the Terminal window is frozen that's normal, it’s because the command is at work.
- Let it for five minutes now click Control + C in the terminal to quit on the last command.
- Then type this command: cp ~/largefiles/largefiles ~/largefile/largefile2
- After you’ve finished typing the command, type in again the same command but you need to change the last number into 3 after it runs change again the last number into 4 and continue typing.
- Continue this pattern until you the message appear saying that the “disk is critically low”
- After you’ve finish type and accomplish this command: rm -rf ~/large files/
- Drag it now to the Trash bin and empty the trash bin. And you’re all done.
What you're doing here is your creating a single large file and you’re storing it in the system folder called large files. And using the third terminal command is just copying the large file in the whole continuously. The last file will completely remove the large files.
You won’t be able to have a similar result using simply just copying the file over and over in the Finder. It's because if you simply just copy-paste or use the Command + D, Mac creates a connection with the old file rather than to create a new file. Now you can clear Mac purgeable space using the Terminal.
Part 4. Conclusion
As you can see, the methods to clear Mac purgeable space can be a tricky issue to some users who will fix the issue. Make sure to read and follow all the guidelines and steps above to avoid the risk. And as you can see we all provide you the options on how you can easily solve this issue. It’s either use the manual method or use a handy tool that can save your time and effort. Using the PowerMyMac tool will provide you the best result to fix anything on your device.


