
Your Mac device enables the user to check what’s holding up the files on your system. Some files are not free to show to avoid modification. The AppleInsider is the one that can access these files and folders that are hidden. Your Mac's operating system has a built-in functionalities for the different forms of hiding a file. These files and folders are hidden in your file system. To avoid the user from accidental deletion of the important stuff on your device and to prevent it to stimulate issues on your device.
How to show hidden files Mac? There are different ways and steps to view the hidden files of your Mac. This article will give you access to view these files. Follow and take the time to read this article for you to know how you can easily view all the hidden files stored on your device.
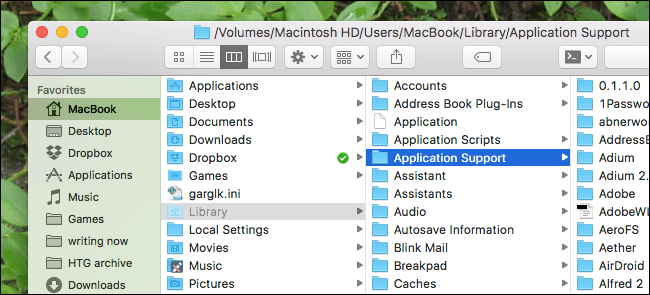
Part 1. Where Is the Hidden Library Folder on Mac?
The library is where all your Mac applications store your stuff, such as the setting and the Caches files. You could only modify these files by editing these files. The hidden library folder is located in the Home folder of your device. You can have a view of these files by going to the Macintosh HD folder and view the library folder there.
Your device contains three kinds of library folders. The folder that you’re able to view is the folder that contains the files that are manageable by the admins, and are free to access by the users. The other one is the ~/Library folder that is located on the home folder and the other one is the folder that your system contains, there are ways to view the Mac library folder follow these steps below.
Tips: Check this post to find all the photo files in your Mac
How to Access the Hidden Library Folder on Mac?
- Go to your Finder App and open the Finder.
- Then Go to the Macintosh HD folder.
- Click Home
- Hold down cmd + shift + .
- You can now view the hidden files.
Here’s another way to locate the hidden files on your device.
- Go to the Finder Application. Click now to open the Finder.
- Hold down the Alt menu option then select Go at the top of the drop-down menu.
- You can now view the ~/Library on the home folder.
Here’s the last way to view the hidden files on your Mac.
- Go to the Finder Application on your Dock. Click to open.
- Select the Go menu.
- Then select Go to Folder or you can type Shift + cmd + G.
- Then in the box type ~/Library then click Go again.
That’s it you can now view, again all the files inside the library. And you now know another step on how to show hidden files Mac using the Finder application.
Part 2. How to Show Hidden Files Mac with a Keyboard Shortcut?
If you are new to Mac and left the windows to upgrade a new device, the steps on how to show hidden files on your Mac is not that easy as hiding a file on your device. This article will then guide you to familiarize how to locate these files on your Mac. If you'll notice that your Mac device is quite related to an Android device. The system performance is both Unix based programs that operate a few things in common. An example of this manner is if you want to keep a history file using a Unix program you have to add a dot (.) You need to add a dot (.) in the first name of your file similar like these
.bash_profile
.svn
.mozilla
.bashrc
These are the examples of the dotfiles prevented on their names. The dot (.) indicates to store the configurations for several applications. Like in some of your browser that contains configuration files and caches. So for you to hide a file you must put a dot on the first name of the file and it'll completely be invisible. But you don’t have to worry because the file you are hiding is still on your device. It is only used to protect your files. See steps below on how to show hidden files on your Mac using by using the keyword shortcut.
- Go to the Finder application on your Mac device.
- Open the Finder application and locate the folder you want to use.
- Toggle the key Command + shift + dot (.)
You can make the file visible or invisible if you wish to. You will notice here that the files become automatically visible after toggling the command.
Part 3. How to View Hidden Files on Mac Using Terminal?
This time we will use the Terminal window to view files on your Mac. Since Terminal commands work very well you can then master the steps below. Please observe the steps below on How to show files Mac by using the Terminal window.
- Go to the Terminal application on your Mac located in the Launchpad.
- Open the window and copy then paste these files in the terminal window display: defaults write com.apple.finder AppleShowAllFiles -bool true
- Click to enter.'
- Then go to the next command line Go to the Finder app. Open the application: killall Finder
- Then continue and click enter to complete the process.
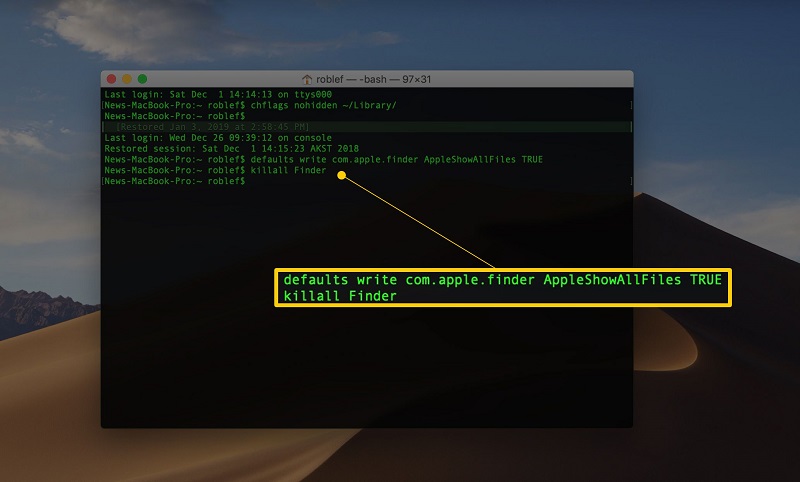
The terminal command line will let your Finder to restart again. You can then repeat the method but you need to alter change the very last word into “False” to completely hide again the file.
defaults write com.apple.finder AppleShowAllFiles -bool false killall Finder
And you’re all done. You now know how to show hidden files on your Mac by using a command line on your Terminal window.
Part 4. How to See Hidden Files on Mac with AppleScript?
After using the terminal window on your device let's now use the Applescript to show hidden files on your Mac. What is AppleScript? This is a scripting language that Apple inc. generated to automatically control the scripture applications on your Mac device. It includes all the versions of Mac as being part of the collection of the automated process on your Mac. Here's how to show hidden files on your mac using the Applescript.
- Go to the Launchpad of your Mac device.
- Now locate the script editor application.
- And copy-paste these codes to the editor pane.
- display dialog “Would you like to show hidden files?” buttons {“Show Hidden Files”, “Hide Files”}
set result to button returned of the result
if the result is equal to “Show Hidden Files” then
do shell script “defaults write com.apple.finder AppleShowAllFiles -bool true”
else
do shell script “defaults write com.apple.finder AppleShowAllFiles -bool false”
end if
do shell script “killall Finder”
- Now Run the file.
- And save the file to use for the purpose.
So if you are hiding or showing files or folders you can launch the script file then Run the file. That's it the easy and simple ways on how to show hidden files on your mac by using the Applescript.
Part 5. How to Delete Hidden Files on Mac?
For you to be able to completely delete the hidden files inside your Mac device you must need to install a reliable fast tool that will surely remove all the unwanted issues of your device. We are talking to not just a tool but also a complete package of utilities for your Mac the PowerMyMac application tool. It has all the features that a cleaning application must-have. Fast, easy, convenient, and very useful in terms of optimizing your Mac device. Here’s how PowerMyMac works.
Step 1. Download and install the PowerMyMac application tool from the official website of the PowerMyMac application.
Step 2. Launch the PowerMyMac application on your Mac device.

Step 3. Choose the Master Scan. This feature is used to clean all the system junk files of your Mac device. Scan the files on your Mac device.

Step 4. Now view the result of all the junk files that the PowerMyMac application scanned.
Step 5. Choose and mark all the files you wish to clean and get rid away from your device.
Step 6. Click now the Clean button after choosing the right junk files. The junk files that you want to remove are all deleted now.
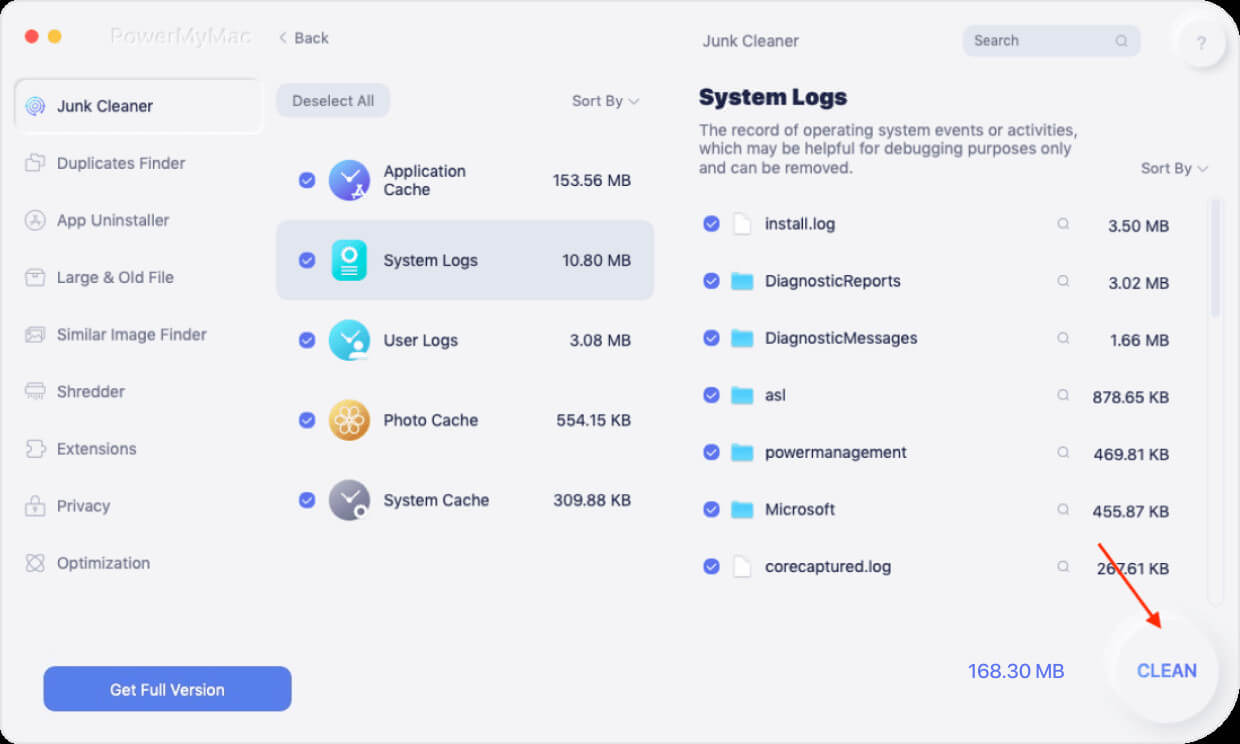
You may enter your Password if it is essential.
Part 6. Conclusion
You will notice that hidden files are files that sometimes become unneeded and unwanted because of no longer using and viewing of these hidden files and because of these files, it’ll start to clutter your Mac device. In order for you to have a clean and organize Mac files, throwing all the unwanted files and cleaning all the unneeded files is the right spot to work out on your Mac device.
Keeping your Mac clean and well is important to all the users who own an elegant device like the Mac Apple computer. You need to protect your Mac by installing a reliable tool that will surely secure your device equipment. The PowerMyMac tool guaranteed to keep your Mac device well all the time. These are the methods to help you through to show hidden files mac completely and effectively.


