
Some Mac users tend to store a lot of photos on their devices. Well, this is one of the best ways on how you can keep your photos from other devices that you have safe from being overwritten or from an accidental deletion that might happen on your device. However, not all Mac users know where are photos stored on Mac. Merely because there are a lot of folders that might contain your photos.
And speaking of photos and folders on your Mac, there are two folders wherein a lot of Mac users are confused about. It is because there are folders on your Mac that says iPhoto Library and the and the Photos Library folder. Most are wondering about these folders. So, if you want to know where are photos stored on Mac and know all about your iPhoto and Photos on your Mac, go ahead and read this post until the end and you will be able to know all about this.
Part 1. What is the iPhoto Library on Mac?
The iPhoto is where you can see all of the images and some other information about it on your iPhoto Library. And when you try to check out the iPhoto Library in the Finder tool, you will be able to see that they appear on a single icon which is also called a package. And that package contains a lot of photos inside it. And once that you try to import some of your pictures to your photo, they are automatically copied, and then the photo is the one organizing them inside the folder.
An iPhoto Library is a certain folder wherein all of your photos and their data are stored. And with that, you are allowed to make a backup of them, move them, and copying them using your Finder. Doing this is just like moving or copying files on your Mac.
What is the Difference Between the iPhoto Library and Photos Library?
The Photos application that you have on your Mac is not made as an alternative to the iPhoto Library that you have had before nor a replacement. The thing with iPhoto is that Apple has already stopped making them and even updating the app. That is why for the new version of the Mac device, it now comes with Photos app only thus the new version of Mac is no longer compatible with the iPhone.
And as we have said, the Photos app that you have on your Mac is a new application and is not a replacement for the iPhotos Library. The Photo Library comes with whole new features such as the following:
- New Auto-Crop tool.
- Square book formats that can be used for printing purposes using Apple.
- It can change the Activity View that you have share which can become like what you have on an iOS device.
- It can sort out photos and also videos that came from your new devices.
Aside from those things that we have mentioned above which are all new features of the Photos Library, there are also some features that it does not have that the iPhoto Library has such as the following:
- The main tool that is built-in is not accessible in the Photos App.
- There are no sync tools for Facebook and Flickr.
- You can no longer edit or add any geotag.
Aside from what we have mentioned above, there are also some other differences between the iPhoto Library and the Photos Library. And with that, here are some of them.
- Organization – In the Photos library, they had already improved the organization system from the iPhoto. And with that, people can now their images in Photos using their Mac.
- Photos – When it comes to syncing photos between Mac and iOS devices, you can do it directly with the Photos app. But for the iPhoto Library, you have to do the whole thing manually.
- Navigation – In your Photos Library, you would notice that you can zoom out your photos and have them be organized according to the date and location
- Speed – checking out the images that you have on the Photos Library is a lot faster than on the iPhoto Library. You can notice this when you have tons of photos on your Mac.
Part 2. Where Are Photos Stored on Mac?
Now, you might be wondering right now on where is your iPhoto located on your Mac. Or, you could be asking yourself the question where are photos stored on mac?
The thing is that Mac devices nowadays have the Photos app stored in them which you can use for you to manage the images that you have on your Mac. It does not matter whether your photos are imported from another device or if you are transferring photos to another because the Photos app can manage them very well.
But, if you are not using the Photos app on your Mac, then you might wonder where are photos stored on Mac then. And we have here some tips for you on where you can find them. They will help you understand well on where are photos stored on Mac.
1. The Photos Library on your Mac is the one who keeps all of your images. However, you should never have its content altered for you to prevent any accidental deletion and as well as to avoid corrupting your photos.
2. The Master's folder is the one who stored directories of your images which is sorted out by the year, month, and day. These folders will then contain images that have the exact date on when it was created.
3. The Master's directory is not made for you to make use of it. Thus, the reason why it is always kept hidden. However, there is still a way for you to access it if you want to. Also, you have to remember that when you delete an image from your directory, then you can no longer see them also on your Photos app.
How Do I Find My Pictures Folder on Mac?
Finding the Pictures folder on your Mac is very easy. And through the steps that we are going to show you below, you will also be able to find some other folders where your photos are stored.
- Go ahead and launch the Finder on your Mac.
- From the Finder app, go ahead and look for Home Directory.
- And from there, you will be able to see the pictures folder.
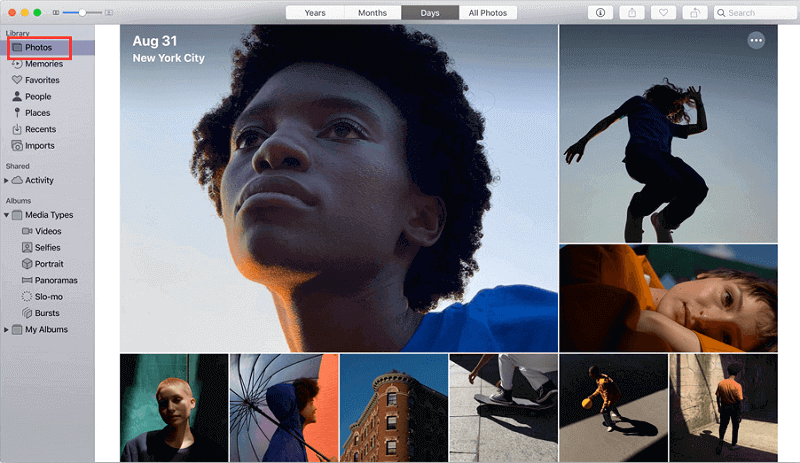
From there, you will be able to see your Photos Library as well and your iPhoto Library. Easy, right?
How Do I Move Photos to A Folder on Mac?
Now, if what you are aiming to do is to move some of your photos to a different folder on your Mac, then this is also an easy task that you can do. And the most common and basic step that you can do is for you to do the Drag and Drop feature.
All you need to do is go to the original location of the photo or photos that you want to move to a different folder on your Mac. And then, launch also the folder where you want those pictures to be moved. Keep those two folders open on your screen.
If you want to move photos one by one, all you need to do is to click and hold the photo that you want to move and then move along your mouse going to the folder where you want the picture to transfer to. And once that you are in the folder window where you want to move your photo, go ahead and simply release the mouse button for you to drop it to the new folder.
And if ever you want to move several photos from one folder to another, just simply select all of the photos that you want to move, then drag them over to the new location you chose. And then, drop the photos to the new folder you desire.
Part 3. How to Delete Unwanted Similar Photos from Mac?
There are also a lot of users who have some photos stored in their Mac that they no longer need. And, deleting them is the best option that you can do for you to free up tons of space on your Mac’s storage. This is recommended for those users who have similar photos stored in their Mac system. Luckily, we have the best tool that you can use for you to remove these unwanted photos of yours from your Mac. And that is by simply using the powerful tool called the PowerMyMac.
The PowerMyMac is a professional tool which can help you in optimizing your Mac. It can help you clean up all those files, apps, and images that you no longer need. And these include those similar photos that you have. And when you use the PowerMyMac to get off these unwanted photos from your Mac, you will free up more storage space and at the same time, boost the speed of your system.
This tool is a professional tool that you can use but comes with a very simple interface that you can access on your own. Plus, this is the also safest way on how you can delete those unwanted photos on your Mac. And before we begin removing those unwanted photos from your Mac, go ahead and download and install the PowerMyMac first and then do the simple steps that we have below.
Step 1. Open PowerMyMac
After finishing with the installation of PowerMyMac on your Mac, go ahead and launch it. By default, you will check out the system status of your Mac.

Step 2. Select on the Toolkit Tab
And then, from the main page of the PowerMyMac, go ahead and simply click on the Toolkit tab right above your screen.
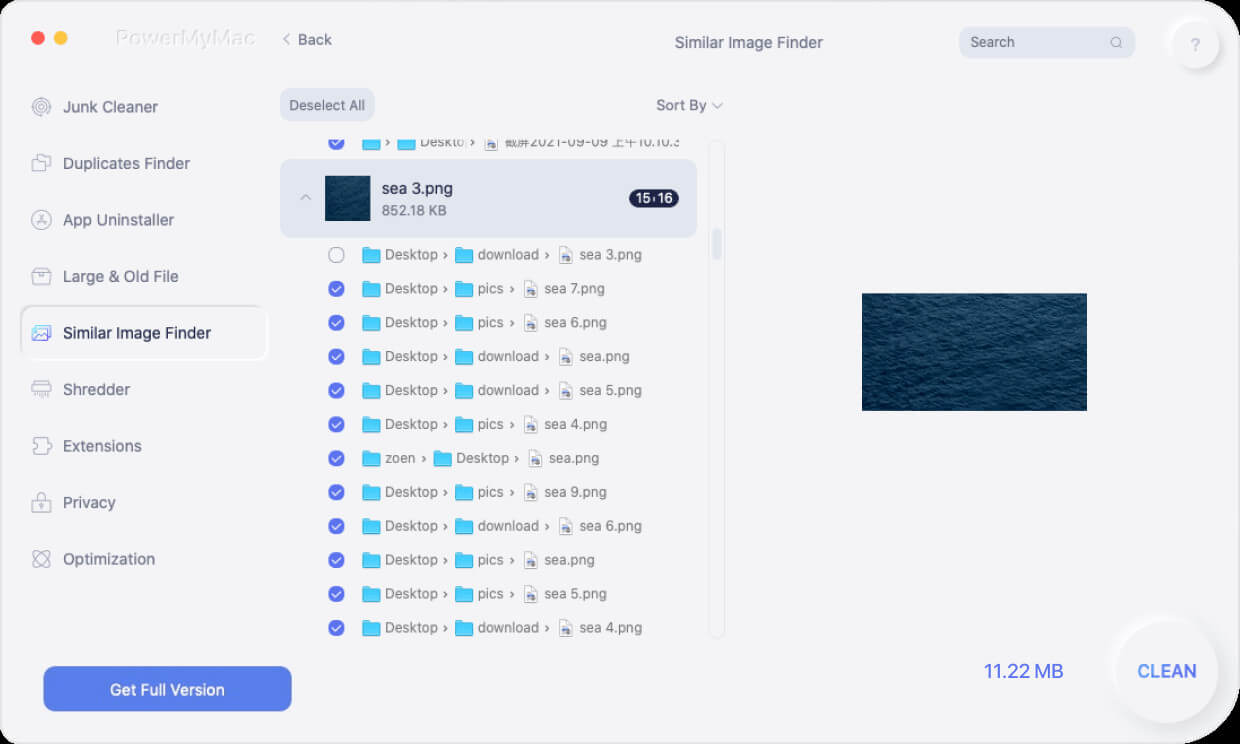
Step 3. Choose Similar Image Finder
Now, on the next page that will show up on your screen, you will be able to see different functions. From the options on your screen, go ahead and choose a Similar Image Finder for you to find all similar photos.
Step 4. Scan for Similar Photos
And after that, the PowerMyMac will then ask you to scan your Mac. So all you have to do is to click on the Scan button and the process will begin.

Step 5. View Similar Photos
After the scanning process is done, you can now view the photos that were scanned by PowerMyMac. And then, on the left side of your screen, you can see all of the photos that have similar photos on your Mac. Just go ahead and preview them one by one and then choose those you want to be deleted.
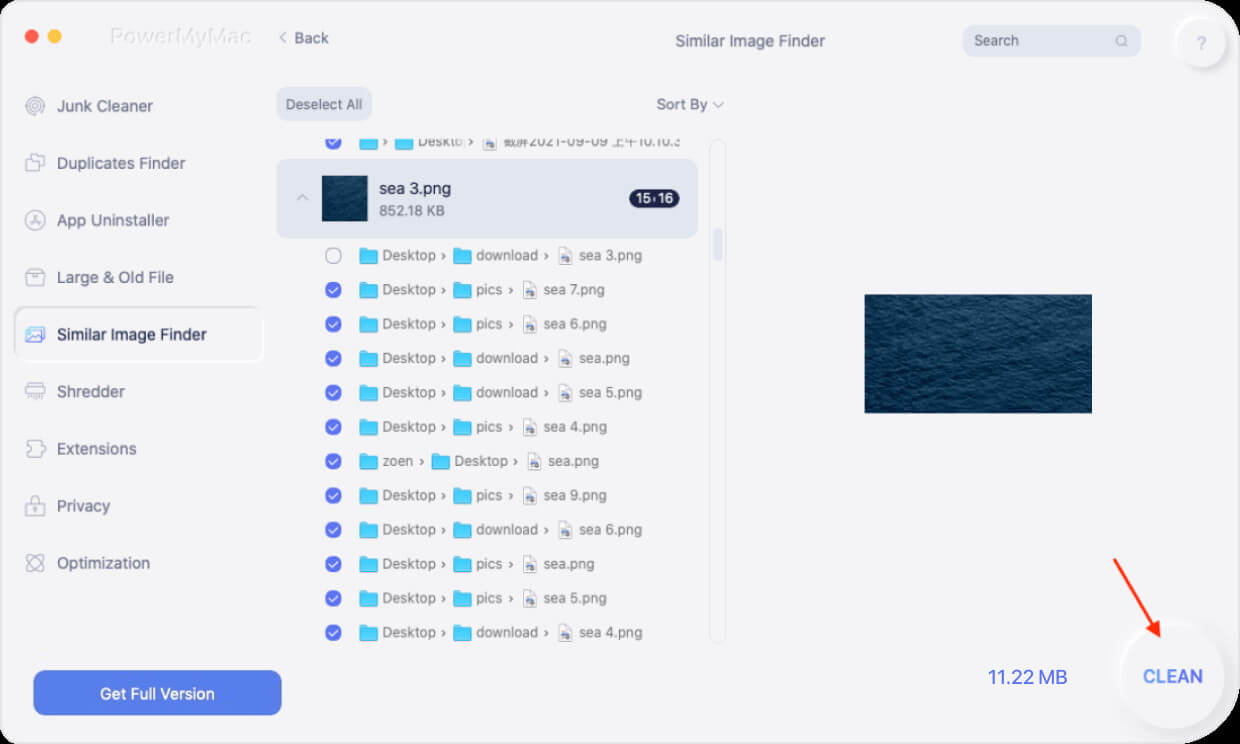
Step 6. Clean Up Unwanted Similar Photos from Mac
Once that you are done choosing all of the photos, all you need to do left is to click on the Clean button below your screen. And then, all the chosen photos will be deleted from your Mac for good.
Part 4. Conclusion
As you can see, knowing where are photos stored on Mac is not that difficult. As well as knowing some of the locations where your photos could be. And if you want to remove photos you no longer need on your Mac, all you need is the PowerMyMac and it will only take you a few clicks to get the job done.


