
We use email to send important messages to our colleagues, friends, and family members. There are a lot of email service providers and apps out there. They’re all used to communicate in order to relay information or answer a question. As such, if you’re a Mac user, you may want to clear Mac Mail cache. This will happen, especially if you encounter errors with the application. This very popular app is not without its flaws and sometimes doesn’t work. That’s why you have to clear the Mac Mail cache.
Here, we will discuss how to clean the Mac Mail cache for you to be able to ensure that the app works properly. This will help you remove the different issues you encounter with the app. So, let’s start clearing the Mail cache of your Mac!
Part 1. Mac Mail Using Too Much Memory?
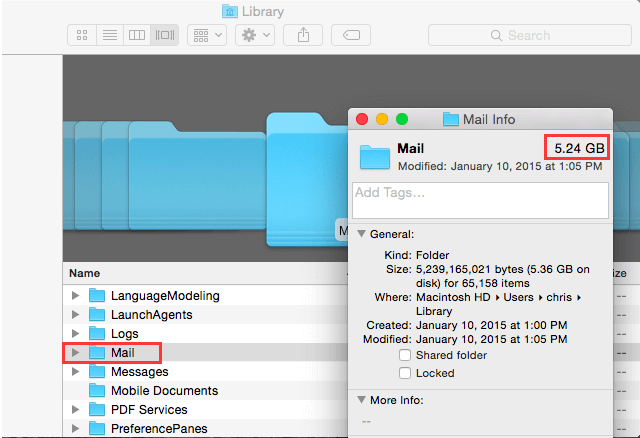
Before we start to delete the Mac Mail cache, let’s talk about if your Mail app is using too much memory within your Mac computer. It is important to note that every user account within your Mac computer has its own Mail directory within the folder for Library. This can be found in “/Users/NAME/Library/Mail” and “/Library/Mail”. These locations are where the application for Mail puts data for every user into storage.
To locate these folders, you have to launch Finder within your computer. After that, click the Go menu, and then choose the option that says “Go To Folder”. Type the following out without the quotation marks and period “~/Library”. Put this into the box. After that, press Enter. Find the Mail folder within the search results that show up. After that, you should CONTROL+CLICK or right-click it. Then, choose the option for Get Info. This will show the amount of space that’s being taken up by the app for Mail for different user accounts.
Part 2. How Do I Clear My Mac Mail Cache?
Here, we will discuss how to clear the Mac Mail cache. Usually, you should do this if you’re having problems with the performance of your Mail app. To clear the Mail cache on Mac is to make sure the app performs properly and without problems.
The steps to do this include the following:
- The first step you should do is to try the option for Rebuild in the menu for Mailbox. Typically, this has the capability to fix a lot of issues and is the first step to clear the Mac Mail cache.
- Quit Mail. The next step is to make sure you shut off Mail from your Mac computer. In this way, you can clear the Mac Mail cache properly.
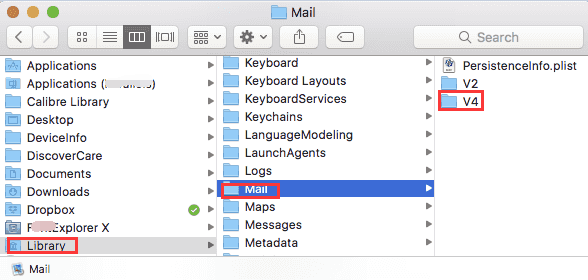
- Go To Finder. The next step is to go to the Finder. After that choose the option to “Go To Folder”. This can be found in the Go menu which you can access through COMMAND + SHIFT + G.
- Paste The Right Directory. The next step is to paste the right directory into the field for text. This directory is ~/Library/Mail/V4. Then, you have to click the option for Go.
- Move To Trash. All the folders located in the directory should be moved to Trash. However, you should keep the folder “Mail Data” intact.
- Launch Mail. Finally, you should launch Mail as you have already finished the process on how to clear the Mac Mail cache. By this time, the Mail app should work properly on your Mac computer.
- Re-Enter Password. For every account within Mail, you should re-enter the password for you to be able to log back into them again.
One last thing you should do is to force your Mail app to rebuild its own index file. You should follow the steps above. However, in Step 5, you should open the folder for Mail Data. Then you should delete the file with the name Envelope Index. It is important to note that these steps are assuming that you are using a mail system that’s IMAP-based. This means the mail is put into storage within the server. If your mail is stored within local folders (e.g., in a POP account or through the archive of old mails to have more storage space within the server), make sure you export the different mailboxes before these steps are done.
The steps above are used to remove every local copy of your messages from the Mail application. Thus, if the copy you have of the messages is within Mail alone, these deleted parts will be removed permanently. However, it’s important to note that this is a great way to clear the Mac Mail cache.
Part 3. How to Delete Mail Storage on Mac?
Now that we have told you how to clear Mac Mail cache, we’ll teach you how to clean Mail storage on Mac. This is also a great way to clear up more space within your computer just as the process on how to clear Mac Mail cache.
Solution 01. Use PowerMyMac Junk Cleaner Module
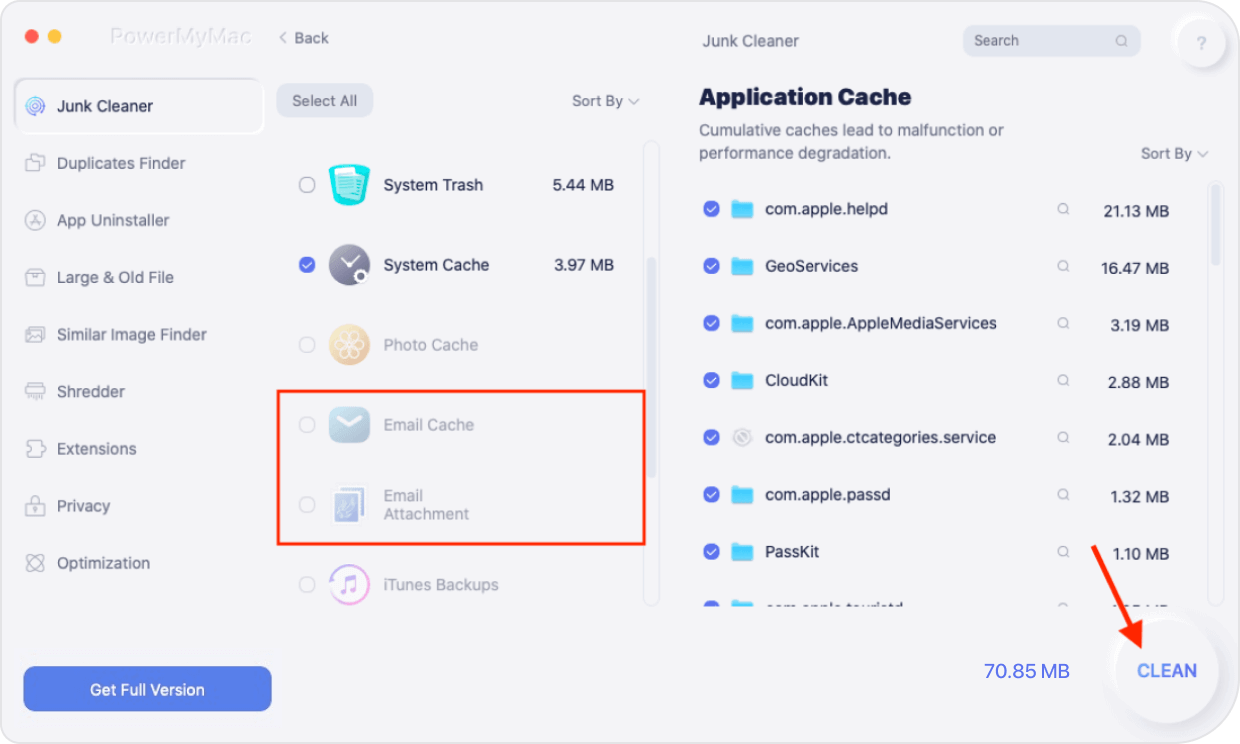
Now that we have told you how to clear Mac Mail cache, let’s talk about how to delete email cache and also email attachments using a powerful tool. For this, we recommend that you use PowerMyMac and its Junk Cleaner feature. It allows you to find unnecessary junk files within your system. Then, you can simply delete them with one click. These junk files include email attachments and email cache. Thus, you are freeing up more storage space within your computer.
Aside from that, it comes with a free trial version where you can clean up to 500MB of unnecessary files within your system. It helps free up gigabytes worth of space within your Mac computer. Thus, the device will perform faster and it will be in optimum condition. PowerMyMac is a great tool that everyone will love. Aside from cleaning up email attachments and email cache, it can be used to get rid of your browsing data. Thus, this will help protect your privacy on your computer.
Solution 02. Minimize The Amount Of Space The Mail Application Utilizes
Now, in this article for how to clear Mac Mail cache, let’s talk about minimizing the amount of space the Mail app uses. The folder for Mail becomes very large because the app itself downloads each email you have. It includes downloading the attachments. These are stored within your Mac. Thus, the email and attachments can be accessed offline. And, they are also indexed within Spotlight so you can search for them easily. The problem is, if you have a lot of emails with big attachments, you may take up a lot of space on your Mac computer. This will slow down your device.
Before, there was a way where you can reduce the amount of space taken up by your email cache. This is by changing the option to keep messages for offline viewing to that of “Don’t Keep”. However, this option is now removed within Mac OS X Mavericks. It is not available in the latest macOS operating systems. Thus, there isn’t a way to control your Mail app in terms of downloading a reduced amount of messages for offline viewing.
But, there’s a way around this. In this article on how to clear the Mac Mail cache, we will tell the Mail app itself to stop grabbing the attachments for offline use. You do this by launching the Mail app. After that, you go to the Mail menu. Then, you select the option for Preferences. The next step would be to click the icon for Accounts. After that, choose the specific account where you want to change preferences. Click the tab for Advanced. Then, uncheck the option that says “Automatically Download All Attachments”.
In this way, attachments aren’t downloaded automatically. However, they are still stored online. Thus, it will help free up storage space within your computer. Another thing you can do is to control the number of messages that the app downloads through the server settings within the server of your email. For instance, within Gmail, you can change a setting that allows you to “hide” your emails from the application called Mail. You can also use this setting to hide messages within other email clients that gain access to it through IMAP.
To do this, you have to follow the steps below:
- Launch Gmail on the web interface. The first step would be to launch Gmail within a web interface. Then, press the menu that looks like a gear.
- Choose Settings. The next step would be to choose Settings. Then, choose the tab that says Forwarding and POP/IMAP.
- Select Size Limits. Within the Folder section, you should choose Size Limits.
- Choose the right option. Then, you should select the option that says IMAP folders will have a certain limit of a number of messages to see.
Sometimes, other email services provide the same settings to edit. In addition, you can also stop your Mail app from utilizing IMAP. Then, you can change its settings to utilizes POP3 and that of SMTP to send and receive email messages.
After that, it would be possible to delete your email from the Mail application. They will be removed from your computer. However, they won’t be removed from the server of your email. It is important to note that POP3 is not a great system in terms of modern email. However, this gives you the ability to get email notifications within the Mail app. In addition, it also allows you to send your messages using it. This is done while making sure the archive is left on the email server alone.
Solution 03. Get An Alternative For Mail
In this article for clear Mac Mail cache, we will also teach you something else. Because the Mail app wastes space completely, you may just don’t want to use the Mail app itself. After that, you can actually delete the cached data of Mail. Plus, it won’t download emails anymore. For instance, if you have a Gmail account, you can use its web-based platform instead. This is called Gmail for your web browser. You can also check out third-party email clients within the Mac App Store. There are a lot of options out there.
In order to not use the Mail app, you can disable or even delete your mail accounts first. Go to the menu for Mail and then choose Accounts. After that uncheck the option called Mail for these accounts – the one where you don’t want to use Mail for. Then, the Mail app will stop downloading your emails from those accounts.
However, there are added steps we will teach you in this clear Mac Mail cache article. You can also disable your email accounts. In this way, the email messages won’t appear within your Mail app. However, they’re still put into storage within the offline cache. It is important that you delete this folder in order to free more space within your Mac computer:
- Launch Finder and then choose the menu for Go. Then, click the option that says Go to Folder.
- Type in the following: “~/Library/Mail/V2” and then choose to press Enter.
- CONTROL + CLICK or right-click the folder that has the file name of the email account you wish to put in the trash.
- After that, click the option that says Move To Trash.
- Then, you can simply empty the Trash to free up more space within the device.
In this clear Mac Mail cache article, we will tell you that if you own a lot of email accounts that have emails that are cached, you may want to remove them. It is done by deleting their folders. This will remove the offline storage of the mail. However, the messages and their attachments are still stored within the server of your email. This is true, especially if you use an email service that’s modern.
Part 4. In Conclusion
Here, we have discussed how to clear the Mac Mail cache. We told you how to check how much space your Mail app takes up within your computer. Then, we taught you how to clear the Mac Mail cache. Finally, we gave you tips on how to delete Mail storage on Mac. It is important that you use PowerMyMac in order to free up more space within your system. This will help you remove the email cache and email attachments that are unnecessary. It’s a great way to make sure your Mac computer is running above-par performance.


