
Google has a lot of services for its users. These include Gmail, Google Drive, Google News, Google Meet, and more. As such, you may want some of these services for your Mac. However, you may want to remove some of them if you don’t use them. One such Google app you may want to remove is GDrive. You should uninstall Google Drive (Mac) for various purposes including the fact that you want to free up storage space. Or, it may hinder the processes on other apps.
Although Google Drive is a safe app to use, we will still teach you how to uninstall Google Drive (Mac). In this way, you can focus on other cloud storage platforms such as iCloud, Dropbox, or even OneDrive. As such, Google Drive and its Backup And Sync app can be removed from your computer easily. We will teach you how below.
Part 1. Google Drive Taking up Space on Mac?
You may want to uninstall Google Drive (Mac) because it’s taking up a lot of space. That’s true for most users. If you happen to have Google Drive on your Mac, it may take up space because you haven’t turned on the syncing process. Or, you may have allowed a lot of files to be available for offline use. In this case, these files have been downloaded on your local hard drive so you can check them out even without an Internet connection.
Another thing you may have done is that you downloaded and installed Google Backup and Sync. This allows you to sync and back up your files and folders automatically to Google Drive. In case this is open, you may not be able to uninstall Google Drive (Mac). That’s why there’s a message that says something similar to this: “The item Backup and Sync from Google can’t be moved to the Bin because it’s open”.
If Google Drive is taking up a lot of space within your Mac, then you may want to remove it. In this case, you may want to force quit or naturally quit your Google Drive + Backup and Sync apps to make sure you remove them both.
Here’s how to force quit these apps using the Activity Monitor:
- Visit The Activity Monitor App. The first thing you should do is to visit the Activity Monitor application on the Mac computer. This is the first thing you should do in order to uninstall Google Drive (Mac).
- Visit Process Name List. Visit the Process Name List within your Activity Monitor. Choose the app or process you wish to remove. In this case, we will be looking for Google Drive. We will also do the steps for Backup and Sync. You will notice that if the process is actually unresponsive, it will show the “Not Responding” label.
- Choose Quit Or Force Quit. You have two options you can choose, Force Quit and Quit. The meaning of these options can be found below:

- The quit option is the same as the standard way of quitting the application. The app or process will be exited if it’s actually safe to implement. AS such, the process or app won’t be exited if it can lead to data loss. The same thing happens when the process or app will interfere with the proper functioning of another app.
- Force Quit. This allows you to force exit the app or process. It may lead to data loss or it may hinder the proper functioning of another application. Thus, if this is the case, other apps can lead to issues.
It is important to note that you can check whether a process is being used by another process or not. To do so, click View. Then, click All Processes, Hierarchically. Once you have quit or force quit Google Drive and Backup and Sync, you can now act on how to uninstall Google Drive (Mac). Check out how to do it below.
Part 2. How to Delete Google Drive Folder from Mac Computer?
If you want to uninstall Google Drive (Mac), you may need to uninstall the application called Backup and Sync first. It is important to note that everything that’s located within the folder of Google Drive is automatically synced to their servers and can be found within drive.google.com. Thus, you have to stop the syncing first by disconnecting your account. This ensures that your files are still in the cloud and won’t be deleted.
So, here’s how to uninstall Google Drive (Mac) without actually deleting its contents from the cloud servers:
Step 01. Disconnect Google Account From The App
- Visit Backup And Sync. The first thing you should do is to go to the menu bar located in the upper right corner of your Mac. Then, click the icon for Backup and Sync. This looks like a cloud with an up arrow in the middle. If an icon isn’t present, you should visit the Applications folder. After that, you should launch the app for Backup and Sync. By this time, the icon will appear.
- Open Preferences. The next step is to click the icon for More. This looks like three dots aligned vertically. Then, choose Preferences within the menu offered in a drop-down format.
- Visit Settings. The Preferences menu will appear. Now, visit the tab for Settings.
- Find Account Details. Now, locate the account within that Mac. Click the option to Disconnect Account. This can be found within the Account Name including its storage information.
- Press the Disconnect button in order to confirm the action.
This is the first step to uninstall Google Drive (Mac). By this time, you have disconnected your account from the app (Backup and Sync) successfully. This means that the folder for Google Drive isn’t syncing anymore. The next step is to quit and trash the app on your computer.
Step 02. Remove The Backup and Sync App
The second step is to remove the app called Backup and Sync. Here’s how to do it in order to go through the process of how to uninstall Google Drive (Mac):
- Visit Backup And Sync. The first step is to visit the Backup and Sync icon. Then, click More afterward.
- Quit The App. The next step is to choose to quit the application.
- Visit Applications Folder. The third step is to visit the Applications folder within your Mac computer. Afterward, search for the app labeled Backup and Sync.
- Drag To Trash. Drag the Backup and Sync app towards the Trash and drop it.
- Empty Trash. Now, open the Trash and then make sure you empty it.

Important Note: If you can’t delete Backup and Sync because it’s still open, you should launch the Activity Monitor and force quit it. The steps are seen in Part 1 of this article. Once that is done, you can move the app towards the Trash back again. You are now on your way to implement how to uninstall Google Drive (Mac).
Now, it’s time to uninstall Google Drive (Mac) including the leftover files of Backup and Sync. These junk files will definitely take up a lot of space within your system. Plus, it can lead to the bogging down of your system’s performance. To get rid of all of these, check out the next main step.
Step 03. Remove All The Leftovers
The final main step on how to uninstall Google Drive (Mac) is to remove unnecessary leftovers that are associated with it. Moving it towards the Trash is not enough. You must also delete unnecessary files to help you remove associated data and free up more storage space within your computer.
- Open Go To Folder. The first step is to visit Finder and press the keys CMD + SHIFT + G together.
- Paste The Different Directory Locations. The next step is to type in the different locations one at a time. The following locations can be found below.
- ~/Library/Preferences
- ~/Library/Cookies
- ~/Library/Containers
- ~/Library/Application Scripts/
- ~/Library/Group Containers/
- Press Go. Now, press Go for each of these directory locations.
- Search For Associated Files. The next step is to find files that are associated with Google Drive and Backup and Sync.
- Drag Towards Trash. Now, drag these associated files and leftover files towards the Trash.
- Empty Trash. The final step is to empty the Trash.
Important Note: You should be very careful about what you delete within your system. One important folder or file can be crucial to the proper functioning of your system. That’s why we recommend that you do another method to uninstall Google Drive (Mac).
Part 3. How To Remove Google Drive from Mac without Deleting Files?
Now, let’s move on to helping you uninstall Google Drive (Mac) without deleting important files within your system. We will do this through the use of PowerMyMac. This is a tool that helps you uninstall apps within your Mac computer. Uninstallation is complete because leftover files won’t be kept within your system.
PowerMyMac also helps you do a lot of things to optimize your Mac computer. For instance, it helps to scan for junk files, large files, and old files. In this way, you can preview and select the ones you don’t want. These can take up a lot of space within your system and bog you down.
As such, PowerMyMac has different modules for your Mac computer. These modules have their own capabilities to help you free up more space within your Mac. Plus, it’s a great way to make sure there’s space for more important files. Another good thing PowerMyMac does is to make sure your Mac is running at optimal conditions – it ensures the Mac is in its best shape.
Here are the steps to uninstall Google Drive (Mac) on your system:
Step 01. Download, Install and Launch The Tool
First, you have to download PowerMyMac from its website found in powermymac.com. You can go for the free trial. Then, once installed, you should open PowerMyMac on your computer.
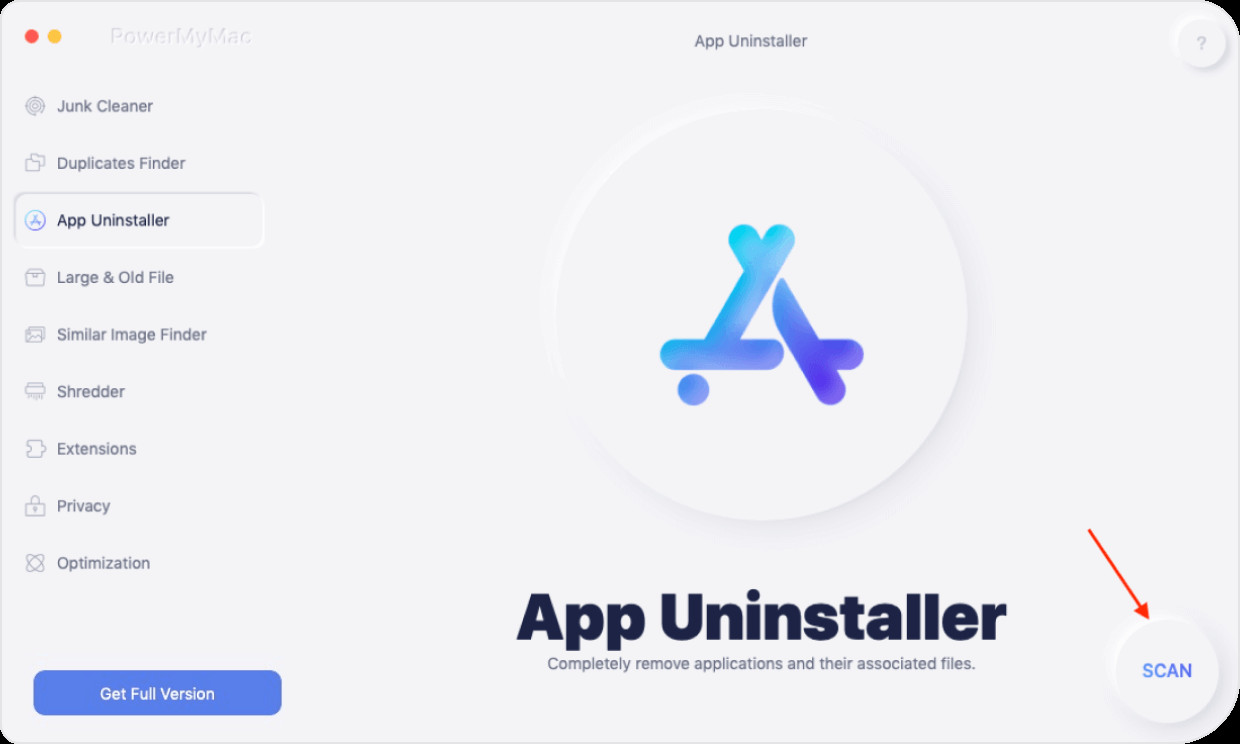
Step 02. Click App Uninstaller
You will see the system status once PowerMyMac opens up. After that, go to the left sidebar and click App Uninstaller.
Step 03. Click SCAN And Wait For Results
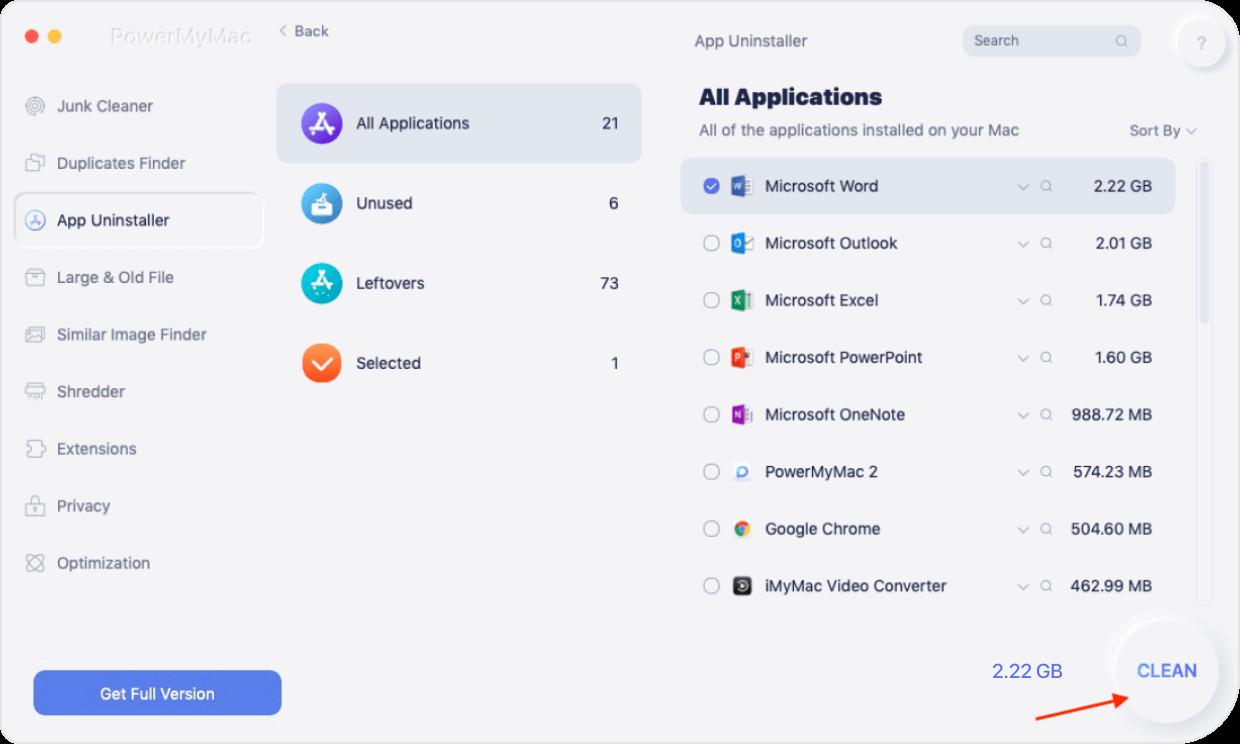
The third step on how to uninstall Google Drive (Mac) is to click SCAN found in the bottom right portion of the PowerMyMac. After that, wait for the list of all apps located within your system. Once the list is shown, you should find Google Drive as well as Backup and Sync. You will see the files associated with it on the right side of the interface.
Step 04. Click CLEAN
Then, you should click the CLEAN button. After that, you should wait for the process to be completed. PowerMyMac will display a window saying “Cleanup Completed” once the uninstallation process is done. It will also show the number of bytes cleaned up. In addition, it will display the storage space left within your system.
Part 4. Conclusion
This guide has given you a comprehensive solution on how to uninstall Google Drive (Mac). We have given both manual methods and automatic methods of implementing the uninstallation. We also told you how to force quit Google Drive and Backup and Sync in order to make sure you can remove it from your system.
The automatic method to uninstall Google Drive (Mac) is the best way. Thus, you have to take advantage of the features of PowerMyMac to help you get the job done. The tool can uninstall every type of app within your Mac and remove its leftovers too!


