
Photoshop is a very powerful tool used to manipulate images. With this tool, the degree of detail you can do with your images is very high. You can manipulate images, add effects, and make enhancements as you wish. However, Photoshop can be a huge hog of storage space within your computer. That’s why you may want to uninstall Photoshop on Mac. In this way, you can free up more storage space within your Mac. In addition, you can use it (free disk space) for more important files in the future.
This article will discuss how to uninstall Photoshop on Mac computers. This will allow you to ensure that you remove Photoshop on your macOS device completely. Our methods work and they will allow you to delete Photoshop and its associated files. No leftover files will remain. In addition, you are sure to completely remove Photoshop and its leftover files instantly.
Part 1. How To Uninstall And Reinstall Photoshop On Mac?
Here, we will discuss how to uninstall and reinstall Photoshop within Mac computers. This is divided into a few different sections depending on the version of Photoshop you’re actually using. Check it out below.
Solution 01. General Steps To Help You Uninstall Photoshop On Mac
One of the most famous raster graphic editors is Adobe Photoshop. However, if you want to uninstall it, this will be very hard to do. Simply dragging the Photoshop app towards the Trash won’t completely uninstall the software from your Mac computer.
And besides, it’s not worth doing. In these situations, two different outcomes are possible. The first outcome would be the application cannot be removed since it’s still being used. The second outcome is the software will be deleted. However, support files made by Adobe Photoshop will still remain as leftovers within your Mac computer.
Here are the general steps that are usually the standard you can follow when you want to uninstall Photoshop on Mac:
- Launch Uninstaller. The first thing you have to do is to launch the Photoshop uninstaller that comes with the software.
- Specify What You Want To Delete. The next thing you have to do is to specify which ones you want to delete. The options include the entire app including its settings or the executive file alone.
- Delete App. The next step would be to actually delete the app.
- Manually Delete Leftover Files. The final step would be to locate the leftover service files manually and delete them. Then, you should empty your Trash.
Now, in the next sections, we will teach you how to uninstall Photoshop on Mac with the different versions. These are the most commonly used versions of Adobe Photoshop. Check out the section that is appropriate to your own version of the software.
Solution 02. Uninstall Adobe Photoshop CS4 Within Mac
Below are the different steps you should follow if you want to uninstall Photoshop on Mac, specifically Photoshop CS4. This is one version of the Adobe Photoshop software that’s very popular. Check out how to uninstall Adobe Photoshop CS4 within Mac computers:
- Quit The App. The first thing you have to do is to quit Photoshop CS4. Make sure everything regarding the app is closed.
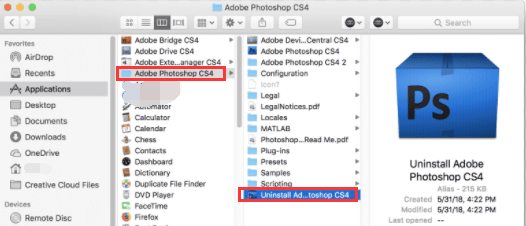
- Launch Finder. The next step would be to launch Finder sand then visit the folder for Applications. After that, go to the folder called Adobe Photoshop CS4.
- Locate The Uninstallation File. Now, you have to locate the uninstallation file of CS4. If you cannot find the file, you should use Finder with the query “Uninstall.app”. This should be located in the folder directory: /Library/Application Support/Adobe/Installers/.
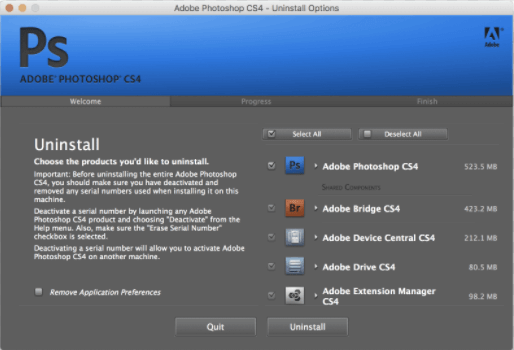
- Enable Preferences For Removing Application. A window will be displayed. You should activate the option that states “Remove Application Preferences”. This will enable you to uninstall Photoshop on Mac, specifically Adobe Photoshop CS4. The preferences files made by the software when working with it will be deleted as well.
- Choose Items To Remove. Now, select the various items you wish to uninstall. If you wish to delete everything, then you should choose every CS4 item in the list.
- Click the button for Uninstall.
- Put Your Password. Now, enter your password for the administrator account. This will start the process of uninstalling Photoshop CS4.
- Delete Folder From Applications. Now, the next step would be to delete the entire folder of Adobe Photoshop CS4. This can be found within the folder for Applications.
- Remove Remaining Leftover Files. Now, if you want to uninstall Photoshop on Mac, you should delete leftover files that can be found in the folders named Adobe Utilities and Adobe Installers. These two folders can be found in Macintosh HD/Applications/Utilities. When you still have other Adobe apps left, you can remove their contents. But, do not remove the entire folders. The contents should be the only ones removed.
- Empty Trash. The final thing you can do to uninstall Photoshop on Mac, specifically CS4, is to empty your Mac computer’s Trash.
Solution 03. Uninstalling Adobe Photoshop CS5 Within Mac Computers
Now, here are the steps to uninstall Photoshop on Mac, specifically the Photoshop CS5 version. This is another popular version of the Adobe Photoshop app on Mac computers. Check it out below.
- Quit The App. The first thing you have to do is to quit Photoshop CS5. Make sure everything regarding the app is closed.
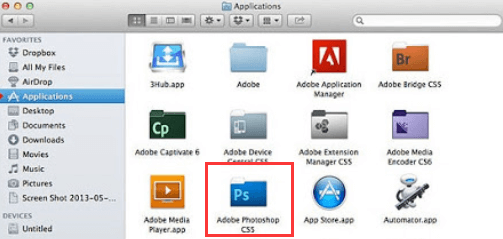
- Launch Finder. The next step would be to launch Finder sand then visit the folder for Applications. After that, go to the folder called Utilities.
- Locate Installers Folder. The third step you have to do is to locate the folder labeled Adobe Installers. Then, run the uninstallation file for Photoshop CS5. When you can’t find the uninstallation file, you can locate it in the folder directory: /Library/Application Support/Adobe/Uninstall/. In this folder, there are multiple files that have file names that cannot be read. You should look for the icon that appears like Adobe’s red icon.
- Enable Preferences For Removing Application. A window will be displayed. You should activate the option that states “Remove Application Preferences”. This will enable you to uninstall Photoshop on Mac, specifically Adobe Photoshop CS5. The preferences files made by the software when working with it will be deleted as well.
- Press Uninstall. The next step would be to press the Uninstall button. After that, input your password for the administrator account for the Mac computer.
- Delete Leftover Files. The sixth step involves deleting leftover files in the folders named Adobe Utilities and Adobe Installers. These folders can be found within Macintosh HD/Applications/Utilities. It is important to note that if other apps from Adobe is still available, you should keep them within your hard drive.
- Empty Trash. After you have finished the process on how to uninstall Photoshop on Mac, specifically CS5, you should empty your Trash. This will ensure that no leftover data is stored within your drive on your Mac computer.
How To Reinstall Photoshop On Mac?
Here’s how to reinstall Photoshop on Mac computers:
- Visit the CC website. Now, go to the website of Creative Cloud and click the option for Download.
- Double-click your downloaded file within the Mac computer in order to start the installation.
- Follow Prompts. Next, follow the prompts on the screen to finish the installation.
- Open Adobe CC. Once the installation is complete, the app for Creative Cloud will open at the same time as Photoshop.
Part 2. How to Uninstall All Kinds of Versions of Photoshop in One Time?
The best method to uninstall Photoshop on Mac easily is through the automatic way. This method enables you to remove Photoshop including its associated files. Thus, no leftovers will be left behind in your system. To do this, you need to use PowerMyMac, which is a tool used to optimize Mac computers. In essence, PowerMyMac has a lot of features and capabilities within it. This tool has a lot of modules with different ways of helping you optimize your computer.
It helps to check your system status so you know the performance of your Mac computer. In addition, it finds all unnecessary files within your system. These junk files can be deleted with a single click alone. PowerMyMac also helps to protect your privacy. This ensures that malicious attacks won’t have your sensitive information.
PowerMyMac also helps to manage your plugins. In addition, it is fully-notarized by Apple. Thus, you know that you’re using a safe and secure tool for your Mac computer. It can also help remove apps you want to delete from your system.
Here are the steps to use PowerMyMac to uninstall Photoshop on Mac:
Step 01. Download, Install And Launch PowerMyMac
Download the official installer of PowerMyMac on its website. Once you have downloaded the installer, you should open it and follow the prompts on the screen to install the software on your Mac. Once PowerMyMac is installed on your computer, you should launch it to take advantage of its benefits.
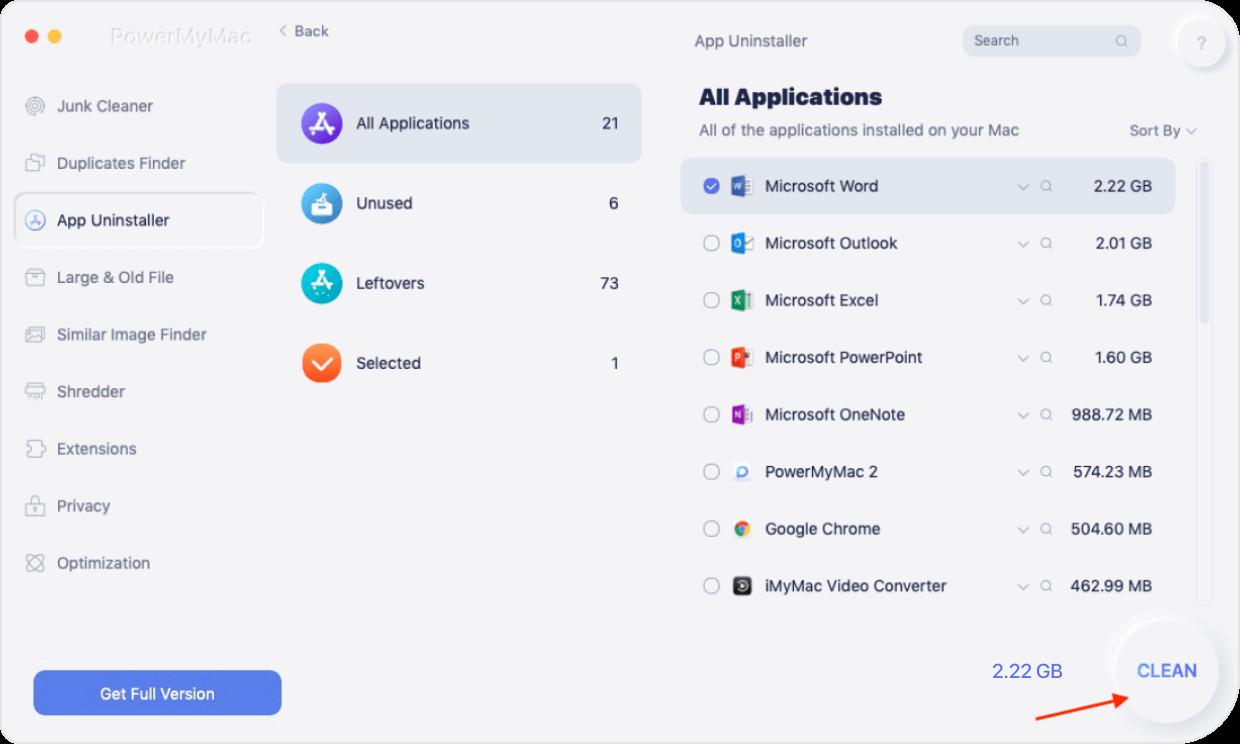
Step 02. Check System Status And Choose App Uninstaller
Check the system status once you launch PowerMyMac. Then, you should click the App Uninstaller module in order to uninstall Photoshop on Mac.

Step 03. Scan Applications
Click the SCAN button for PowerMyMac to scan your entire system for all applications within it. The process will take only a few seconds to a few minutes. Thus, it’s best to wait for it.

Step 04. Check Out Apps And Select Photoshop
Checking the list of results that come up after the scanning process. These apps will be shown on the second sidebar at the left. Of course, if you want to uninstall Photoshop on Mac, you should select the Photoshop app from the list.
Step 05. Uninstall Photoshop On Mac
Once you have selected Photoshop, the list of files associated with it will show up on the right side of the interface. Click the CLEAN button to uninstall Photoshop on Mac. Wait until the cleanup process is complete. This will be confirmed with a pop-up window that says Cleanup Complete.
Part 3. How to Uninstall Adobe Creative Cloud on Mac?
Here, we will teach you the method to uninstall Adobe CCs on Mac. This involves using the manual way of removing Photoshop from your Mac computer. This manual method is not recommended because Photoshop is one of the most difficult programs to remove from both Mac and Windows computers. However, we will still place it here for informational purposes. Here are the steps to do it:
- Quit CC 2015. The first thing you have to do is to make sure you quit the CC 2015 Adobe Photoshop version within your Mac.
- Visit the Applications Folder. The next step would be to visit the folder for Applications. After that, you should find the Adobe Creative Cloud. Then, you should launch it. This is usually located within the folder that’s called Adobe Creative Cloud as well.
- Go To Apps. Then, within the window for Creative Cloud, visit the tab labeled Apps. The next thing you have to do is to find the application for CC 2015 for Photoshop.
- Press Cogwheel Icon. The fourth step would be to press the icon that looks like a cogwheel. You have to click Uninstall after that.
- Confirm Action. You should click the option to remove application preferences if you want to.
- Uninstall Creative Cloud. If no more files and apps are within Creative Cloud, you can uninstall it completely as well.
And that’s it! We have taught you how to uninstall Photoshop on Mac! Keep in mind these tips to help you uninstall Photoshop completely. In addition, you will be able to uninstall Creative Cloud from Adobe as well.


