
A lot of us want to read articles but don’t have time to do so at the current moment. That’s why we bookmark it or put it into our reading list to check it out in the future. In this way, we don’t have to search for the page all over again on search engines such as Google. But what if you want to know how to get rid of reading list on Mac and the Safari browser? This will allow you to save more space on your Mac. Plus, it will help you refresh your reading list to a new start. At least, it won’t be crowded where you have a list you have already read in the past.
That’s where we come in. We will help you on how to get rid of the reading list on Mac easily. Your reading list is important. But once you don’t need it anymore, you have to know how to get rid of the reading list on Mac. We will teach you the steps on how to do so. But first, let’s see what a reading list is.
Part 1. What Is A Reading List On Safari?
There are times when you want to save a web page so you can check it out easily in the future. That’s where the reading list is useful. Safari’s feature known as Reading List allows you to save webpages so you can read or check them out again at a later point in time.
So what’s the difference between a reading list from a bookmark? There’s one key difference between the two. The webpages that are saved within your reading list can be accessed even if you don’t have an Internet connection. Bookmarks, on the other hand, can only be accessed if you are connected to the Internet. The reading list actually utilizes iCloud in order to sync it to all associated logins. Thus, you can access this reading list across multiple devices as long as you are logged into the same iCloud account.
So, how to get rid of the reading list on Mac? Is there any way you can do to remove your unused reading list or the list that you have checked out already? Below, we will teach you how to do it.
Part 2. How To Get Rid Of Reading List On Mac?
Actually, there are multiple ways on how to get rid of the reading list on Mac. These ways differ in their approach and difficulty. The first manual method is actually deleting the items on the list one by one. The second method, which is the faster method, involves the use of an app that will help you on how to get rid of the reading list on Mac.
Let’s talk about the first manual method (which is more difficult) first. Actually, you can’t delete all items in the reading list on iOS all at the same time. This doesn’t exist currently. That’s why you have to obviously delete the reading list on Mac one by one or all at once.
Here are the steps on how to get rid of the reading list on Mac:
- Go To Safari. The first step would be to visit Safari and open it on your Mac computer.
- Show Your Safari’s Reading List. The next step would be to choose View in Safari. Then, select the option to Show Reading List Sidebar. This is only possible if the reading list isn’t displayed yet.
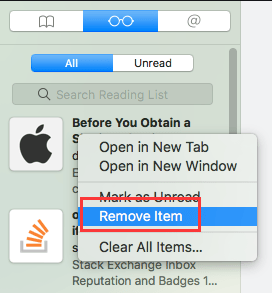
- Select An Item. Now, you have to select an item. In order to do so, CTRL + CLICK that particular item. Then, go to the next step.
- Remove The Item. The final step to removing an item is to select Remove Item after the CTRL + CLICK you have done earlier.
- Repeat For All Items. If you want to implement how to get rid of the reading list on Mac, you should repeat the steps for all items so you can clear out the entire list.
If you’re utilizing the macOS, easily deleting reading list items can be done. Once you go to CTRL + CLICK on Step 3 above, you can simply select the option for Clear All Items. After that, the process should be confirmed by clicking the option for Clear. If your iPhone, iPad, or iPod has the same iCloud account as that of your macOS, then the items on your reading list will be deleted as well on these devices.
It is important to note that this process can’t be undone. It won’t be moved to Trash. Once your reading list is deleted, it will be removed permanently. That’s why you have to be careful when you implement how to get rid of the reading list on Mac.
Now that we have gone through the difficult way on how to delete your reading list within Mac, we will go through the easy route. The method will be explained below.
Part 3. How To Automatically Get Rid Of Reading List On Mac
This section will focus on how to get rid of the reading list on Mac easily. We will be using software that will automatically get rid of our reading list easily. In this way, you don’t have to go through the manual method of deleting your reading list. So, what is this so-called method? We are referring to PowerMyMac. It’s software that allows you to get rid of junk files within your system. This powerful software will help you to remove unnecessary files such as unwanted apps, system cache, browser history, system logs, and more.
Here are some of the features of PowerMyMac:
- Cleans Up Junk. PowerMyMac is an all-powerful tool that helps you remove junk from your system. As you may know, once you use your Mac for months or even years, junk files will pile up. This will take up a lot of storage space and eventually slow down your system. PowerMyMac removes duplicate files, iTunes junk, System junk, old files, large files, and even email junk.
- Preview And Selection. Once PowerMyMac scans your system for junk files, you can easily preview all these files one by one. Plus, you can select which ones you want to delete. You can also deselect the items you wish to keep.
- Powerful Scanning Feature. PowerMyMac is very powerful in the sense that it scans your entire Mac system for unnecessary files. It ensures no important system files will be shown or deleted. Thus, you are sure that your macOS will still work properly after deleting all junk files.
- Remove Apps. If you want to remove apps completely, PowerMyMac is here to give a helping hand. Apps are removed totally. This means their associated files are not left. The leftover associated files will be deleted as well. So, what’s the great thing about it? There’s more storage space for you.
- Manage Start-Up Items And Extensions. You can use PowerMyMac to manage your extensions and your start-up items. Through the app, you can switch these on or off. In this way, you won’t have to be bogged down by a slow Mac which has a lot of things going in on it.
- Protect Your Privacy. PowerMyMac helps protect your privacy too. Since browsers save your browsing history and cache, this will take up a lot of space. There’s a risk of revealing your passwords and browsing history on the Internet. These traces will be removed by PowerMyMac easily.
Here are the steps on how to get rid of the reading list on Mac using PowerMyMac:
Step 01. Download And Launch PowerMyMac
Initially, you have to grab the installer of PowerMyMac on its official website. This can be found on the Internet. Once you have downloaded the installer, you should open it on your Mac computer. Then, you should follow the instructions found on the screen to install it. After that, you can simply launch the PowerMyMac software on your computer.
Step 02. Check System Status And Click Junk Cleaner
Once you enter PowerMyMac, you will be greeted with the system status of your computer. You can check information about your CPU, Network, and Memory. After that, click Junk Cleaner which is located at the left sidebar to start the scanning process.

Step 03. Preview And Select Items
Wait for the scanning process to be finished. After that, you should preview the items you wish to delete. In this case, if you want to implement how to get rid of the reading list on Mac, you should look for these items within the interface. Then, select the items that you want to be removed.
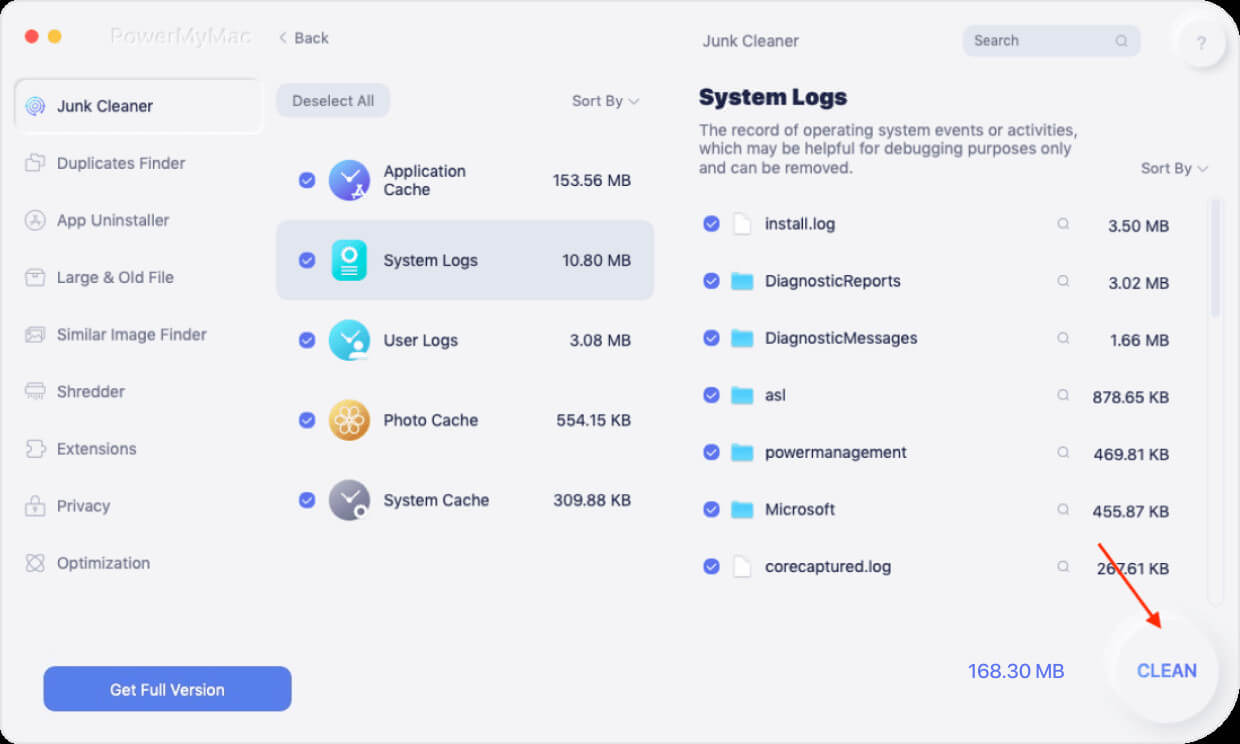
Step 04. Click The Clean Button
Once you have selected the items you wish to delete, you should click the button called “CLEAN”. Confirmation is not necessary. Wait until the process for cleaning up these files are complete. Once this is done, it will indicate “CleanUp Completed”. It will also show you how much storage space has been cleaned after you have deleted the unnecessary files.
Part 4. Conclusion
This guide has given you tips on how to get rid of the reading list on Mac. You can either do it manually or through software. It is best to use PowerMyMac instead because it can help you get rid of the reading list on Mac easily. Plus, it’s a very powerful tool that works to optimize your computer.


